--[ Experiment 0x02: Seeking Seeker ]--
Threat intelligence
By: ZoqueLabsThis writing is distributed under a Creative Commons CC BY-SA (Acknowledgment - Share Alike) license. It was produced with the support of Derechos Digitales.
Spanish version
-[ToC ]-
-> 0x00 Intro -> 0x01 Understanding Seeker -> 0x02 OpSec -> 0x03 On the hunt (favicons first) -> 0x04 Document findings in Colander -> 0x05 Export Feeds and use them as IOCs in MVT -> 0x06 This is just the beginning.
–[ 0x00 Intro ]–
Greetings, people!
At ZoqueLabs we love threat intelligence, and this is our first write-up on the topic. After digging deep into the guts of Android, we changed the scenery to sniff out some TCP/IP and start a basic but powerful experiment: learning how to search for and track malicious infrastructure.
The starting point was this article: Seeker: How a Simple Link Can Reveal Your Smartphone’s Location. From there we set the goal: find instances of Seeker, document them, and generate reusable and shareable indicators of compromise.
First we played with Seeker (we’ll explain what it is and how it works) using temporary and free segfault servers —a service from The Hackers Choice— and, along the way, we learned to use those same servers as proxies to peek more safely into the infrastructure we were finding. That entire journey is documented here, with a section dedicated to OpSec applicable to this and many other cases where malicious infrastructure needs to be touched.
We did the hunt with Censys and Shodan (free versions). Think Google, but instead of pages, they return metadata that gives away connected services and devices - just what we need to profile targets.
Of course: detecting is not enough if we cannot share. That is why we organize, classify and standardize information so that it serves sister organizations. With previous experience in Colander —free case management software—, we set up the case and leverage features that help us turn data into actionable intelligence. Additionally, we enable feeds to export STIX2 rules that can then be consumed in MVT.
This writing comes loaded: hacking tools, infrastructure tracking, ephemeral VMs, tunnels, proxies, IOCs, Colander, MVT, OpSec and, yes, everything free! So clean your terminals: we are going to get them dirty. Come on!
–[ 0x01 Understanding Seeker ]–
0x01.1 The basics
Seeker is a tool that uses browser APIs to extract precise location and other data from the device. It was created to perform geolocation phishing, that is, tricking a target into sharing their real location through the browser. But that’s not all, it also collects device metadata such as model, screen resolution, operating system, network and more. It does not install anything, it does not exploit vulnerabilities, it does not mess with the operating system. Just wait for the victim to enter a link and give the browser permission to share the location. With that, Seeker does its job.
On a technical level, Seeker builds a web server that serves a personalized page (such as Google Drive, Telegram groups, Whatsapp..). That page includes a JavaScript script that asks for location access using the HTML5 Geolocation API. When the browser allows it, Seeker captures:
- GPS coordinates (latitude, longitude)
- Precision (in meters)
- Public IP
- System details: browser, operating system, resolution, etc.
Then, in most cases, seeker redirects the victim to a legitimate page, thus trying to go unnoticed.
Everything is stored and displayed in real time from the terminal. However, in our research, we noticed that even if the default browser denies Seeker geolocation, it still collects sensitive information such as: public IP, browser, operating system, device type, etc. This is what we mean when we talk about keeping a good opsec during the search, so as not to provide information that could identify us.
And this is where Seeker becomes relevant: it’s simple and it works, and that’s enough to show that social engineering is still effective. We know that many malicious campaigns, especially in Latin America, use very similar tactics: a link, a cloned website, and the browser doing the rest. Learning how Seeker operates allows you to see the attack from the inside, understand how it moves, reproduce it in controlled environments and begin to recognize patterns that could go unnoticed in a first analysis. Keep in mind that the complete information from the browser does appear in the logs.
Well, without further ado, now let’s run Seeker.
0x01.2 Run Seeker
Before running it, we recommend always doing it from a controlled environment: a virtual machine, container, or isolated infrastructure. Not only for security, but to avoid accidentally leaking information. We decided to use one of The Hackers Choice.’s free, temporary segfault servers
0x01.2.1 Segfault
Segfault is an ephemeral temporary server service: Linux machines that you can build with a single command and that disappear after a few days. They are perfect for quick tests, controlled experiments and —as in this case— running tools without dirtying your own equipment.
The interesting thing is that you don’t need to create accounts or register anything. A single command via ssh gives you immediate access to a server with a public network. That means you can use it as a testing space, as a bridge (proxy), or even as an exit point for reverse tunnels.
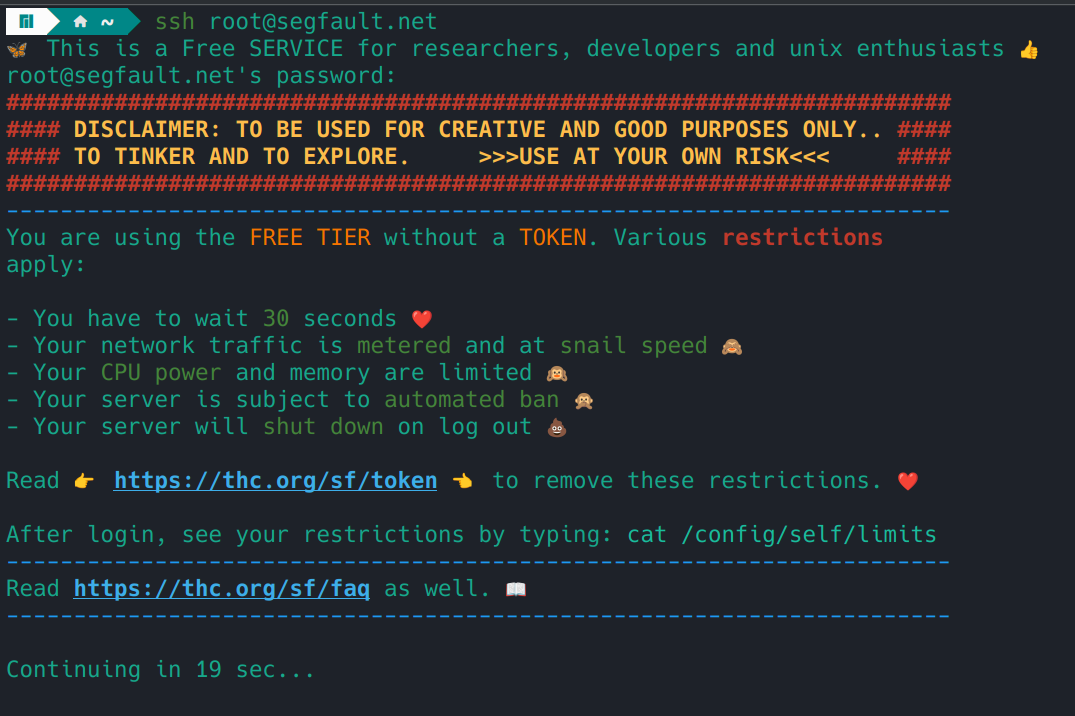
ssh root@segfault.net
By default, these machines die on their own after a while. But there’s a trick: you can save your login credentials (the SSH key that’s generated the first time), and if you reconnect within 72 hours, your session is still active. This allows you to resume experiments without starting from scratch, as long as you don’t let too much time pass.
When it finally falls, you just pick up another one and that’s it.
0x01.2.2 Tmux - keep Seeker alive
tmux is a pocket multiplexer, it is what prevents you from losing everything when the SSH goes down. Let’s imagine tmux as several screens within a single connection: Seeker in one, tunnel in another, tests and logs in another. If the connection is broken, the session is still alive and you can reconnect. Here we use it to:
- Panel 1: Running Seeker and Prevent it from dying if we lose the connection.
- Panel 2: the HTTPS tunnel
Basic commands we use:
tmux new -s seeker # create session 'seeker'
# inside tmux:
# split horizontal: Ctrl-b "
# split vertical: Ctrl-b %
# move between panels: Ctrl-b o
Ctrl-b d # detach
tmux attach -t seeker # reconnect
This gave us peace of mind that even if the SSH was cut, Seeker would continue running. It was just a matter of reconnecting and doing tmux attach.
0x01.3 Starting Seeker — step by step inside segfault + tmux
With all this ready now, let’s get to what we came for.
- Clone the repo: Within segfault we are going to install seeker from the official repository in github, with the following command:
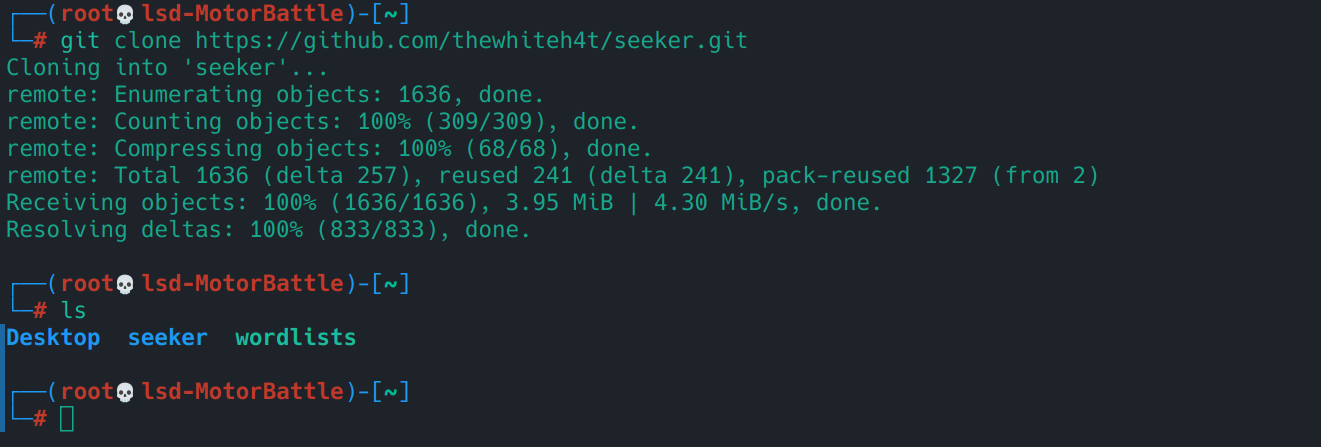
git clone https://github.com/thewhiteh4t/seeker.git
It should look like this:
─(root💀lsd-LizardSoft)-[~]
└─# git clone https://github.com/thewhiteh4t/seeker.git
Cloning into 'seeker'...
remote: Enumerating objects: 1636, done.
remote: Counting objects: 100% (312/312), donate.
remote: Compressing objects: 100% (63/63), done.
remote: Total 1636 (delta 266), reused 249 (delta 249), pack-reused 1324 (from 2)
Receiving objects: 100% (1636/1636), 3.95 MiB | 3.10 MiB/s, done.
Resolving deltas: 100% (836/836), donate.
It may not let you install if you have not prepared the VM in segfault, if you want, you can pass the
apt updatefirst,apt install python3 python3-pip curlso it does not throw errors.
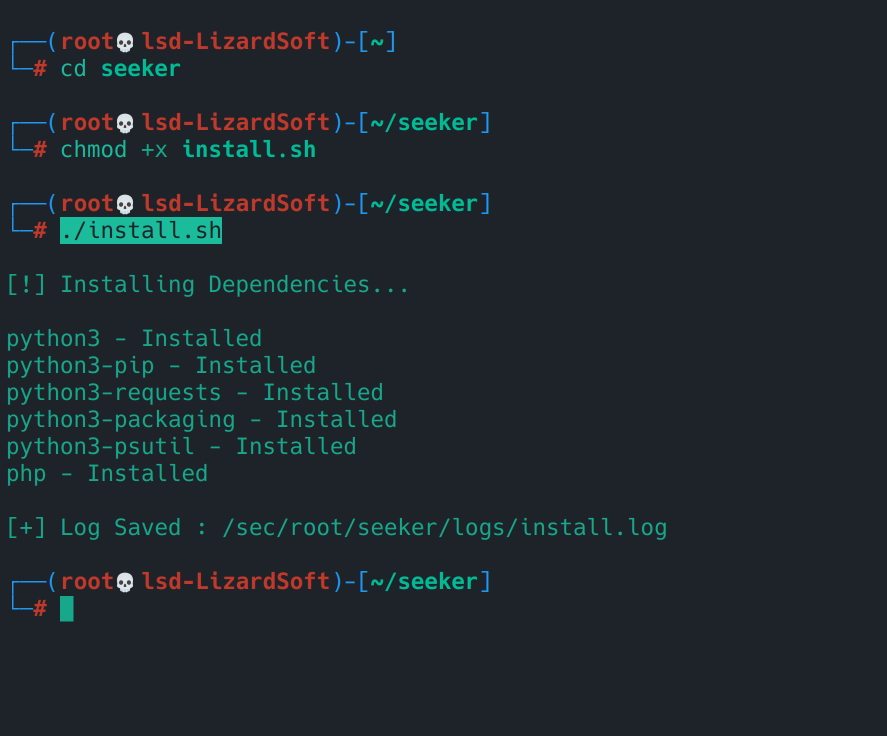
- Now, go to the path where Seeker is and install it on the VM like this:
cd seeker
chmod +x install.sh
./install.sh
- Good there. Now let’s run seeker from the
tmuxwindow.tmux new -s seeker
Once inside, we run seeker with:
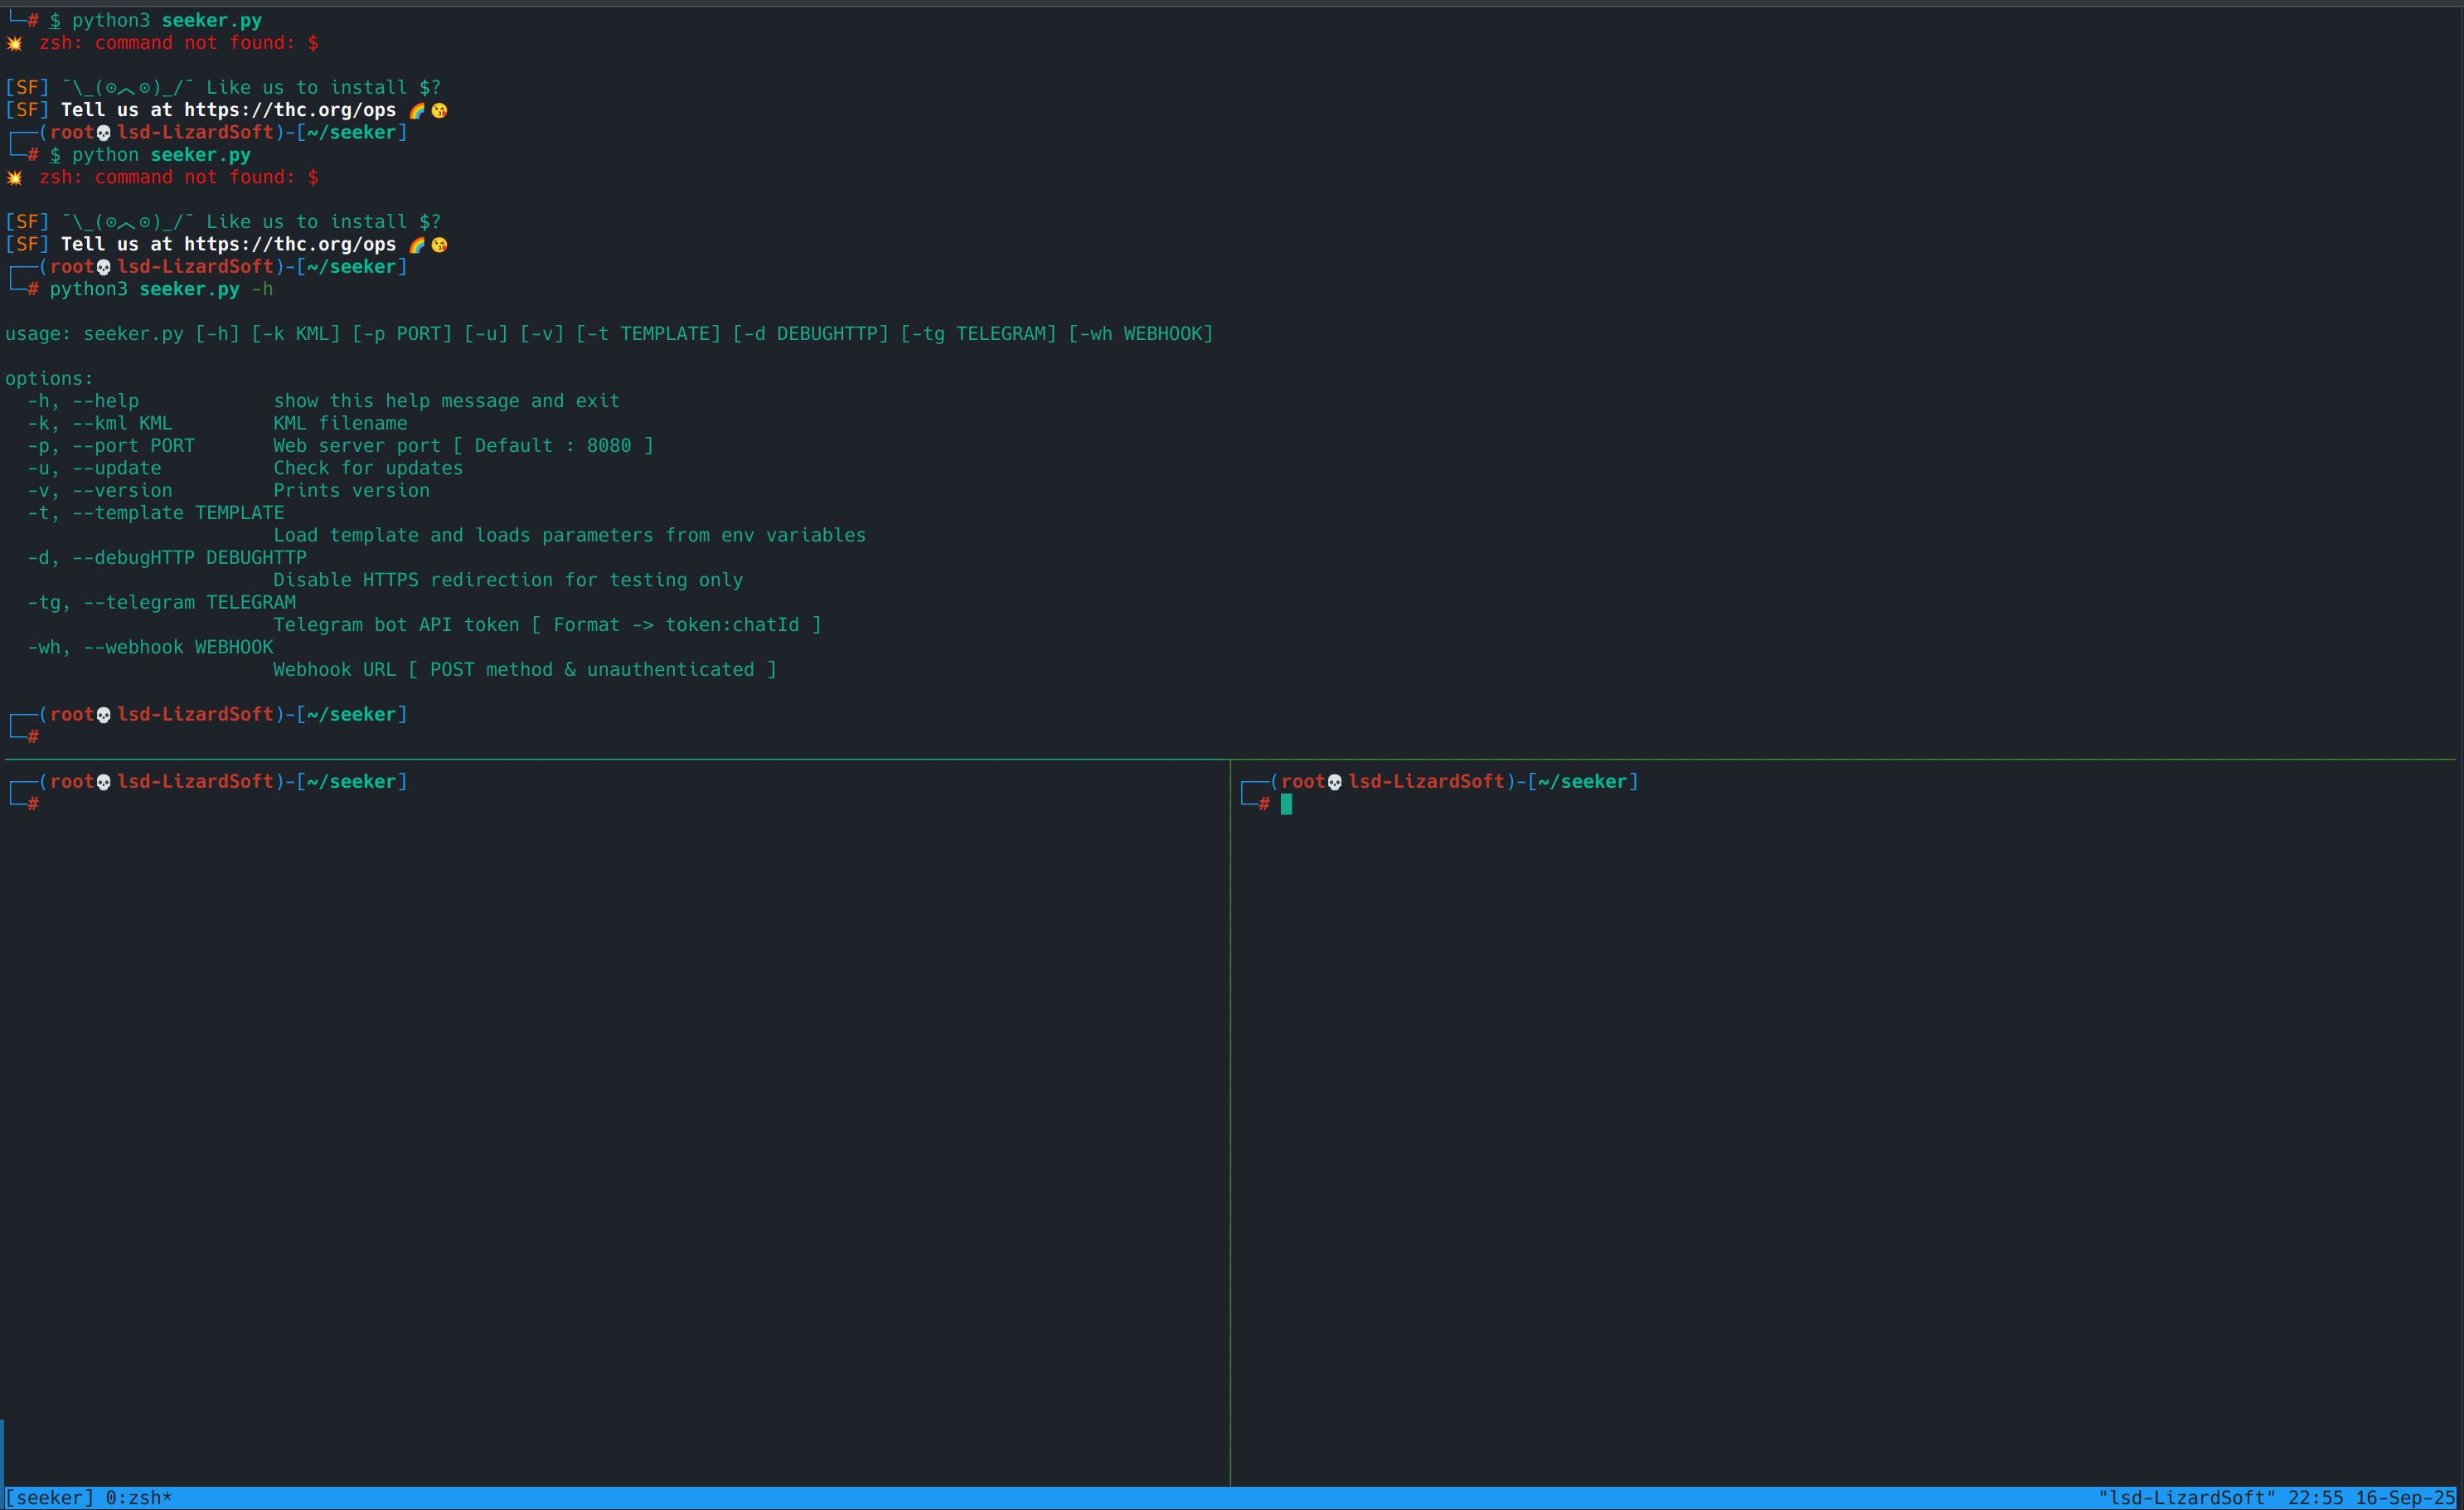
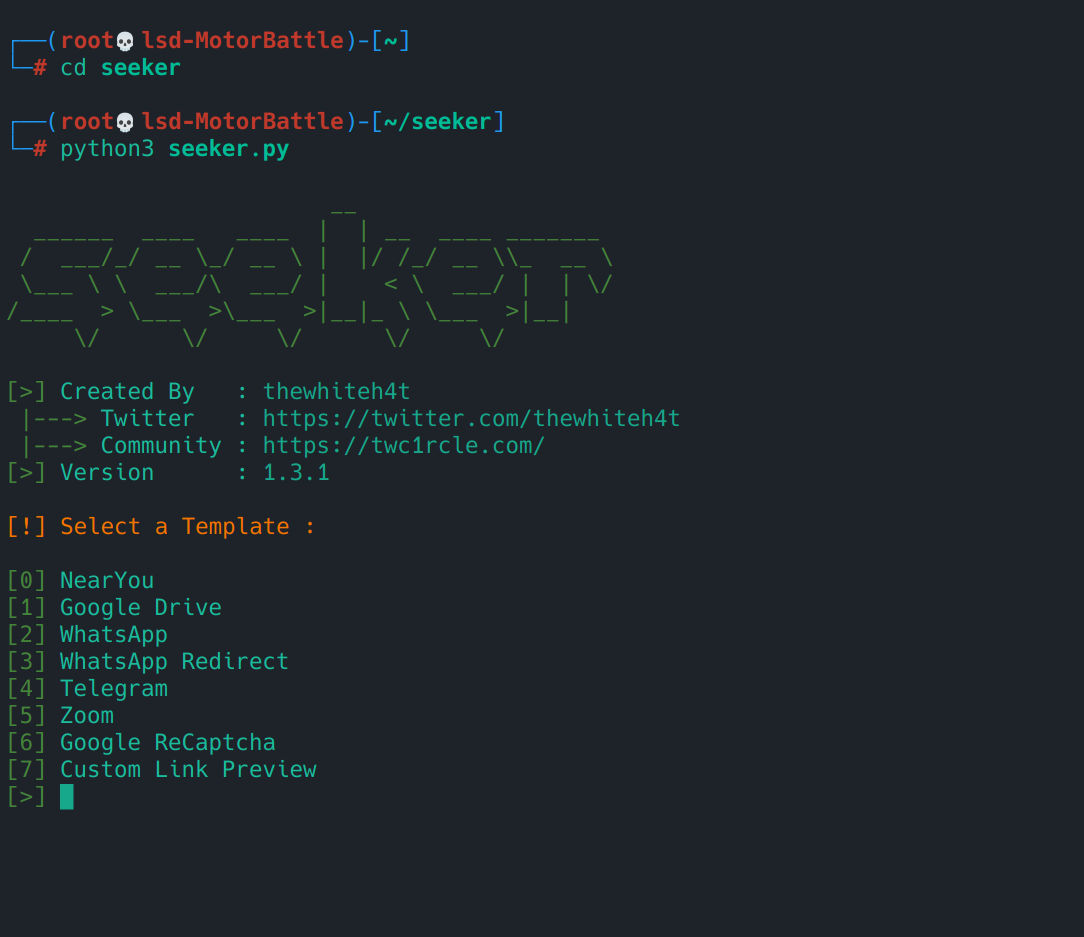
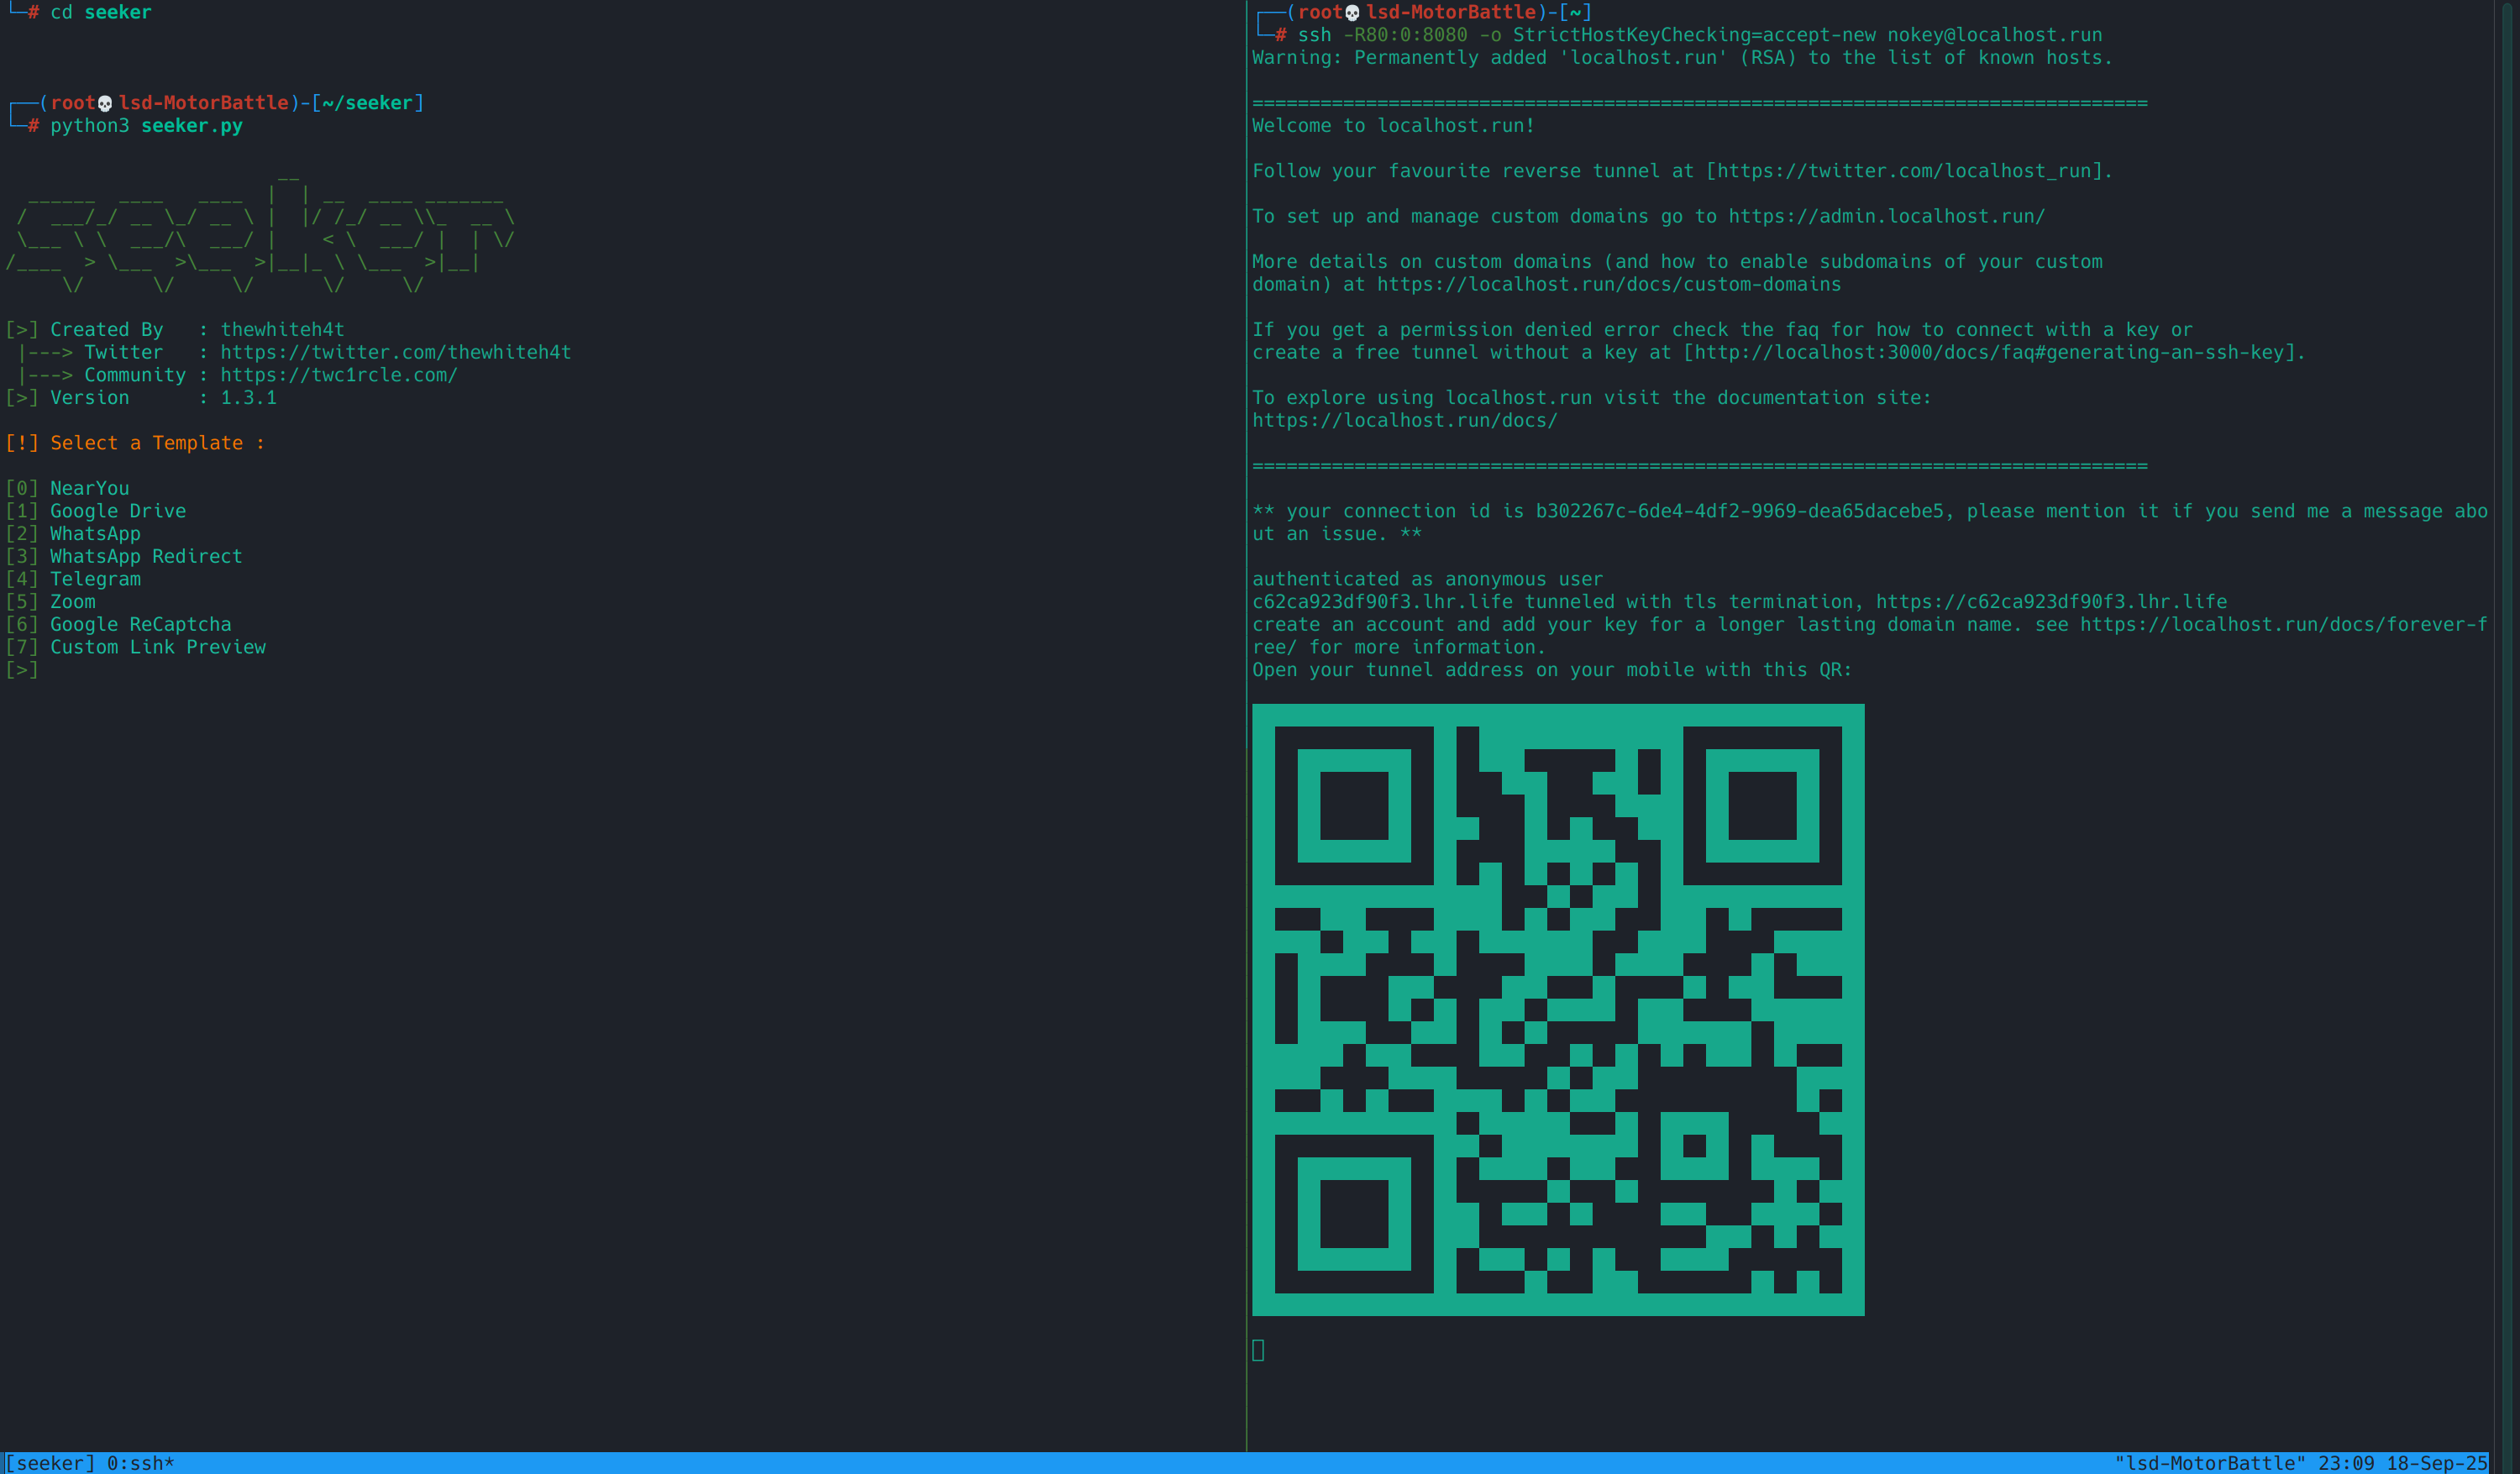
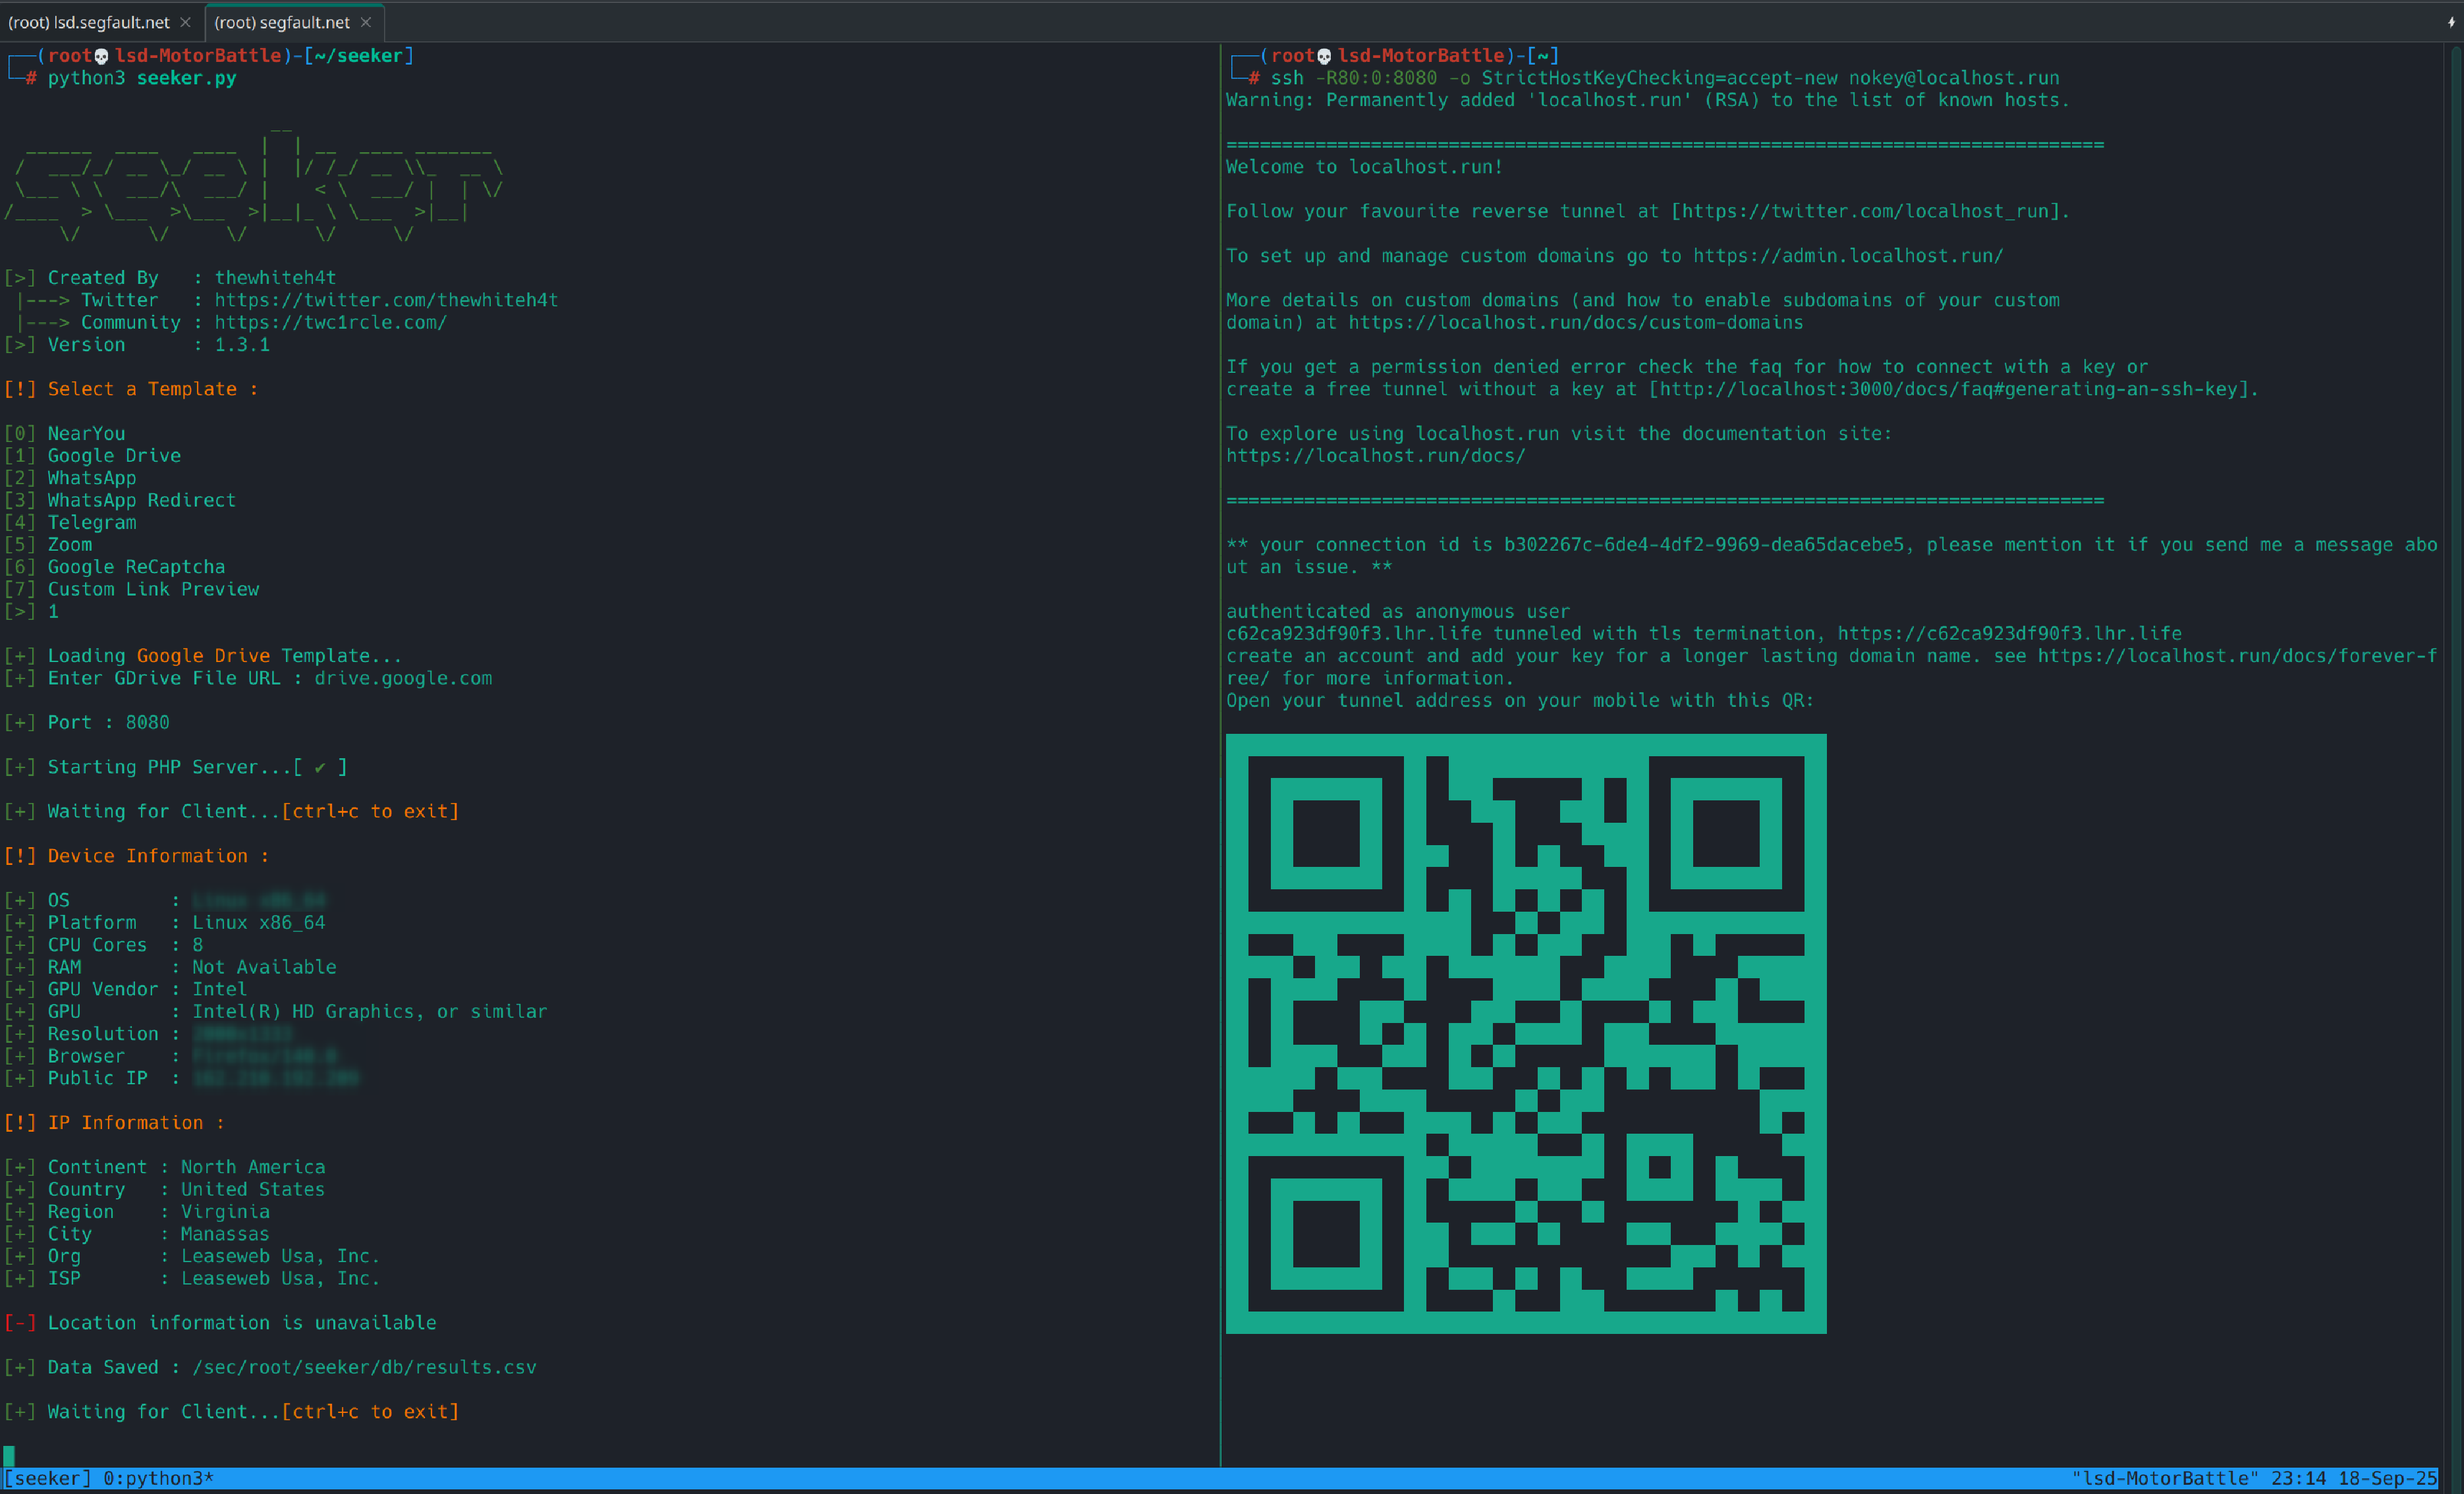
python3 seeker.py
Here you can select an option: Google drive, Near You, WhatsApp, Telegram, etc. These are the templates that Seeker has by default, the idea is to test them and collect information. When we choose a template it will ask us for some data such as redirection pages or images for WhatsApp groups. Once the template is configured, you should see logs in the console indicating that the server started and is listening at http://127.0.0.1:8080 (or in the port indicated). Additionally, when requests arrive, you will see real-time entries with IP/time/user-agent and, if you accept location, lat/long.
With Seeker booting to localhost:8080 we now have the service ready locally. Now the next step is to make that instance accessible from the outside, not to “fish people”, but to see how a real instance is presented from an external browser, analyze the requests and metadata it leaves, and extract reusable features for searches in Censys/Shodan. To do this, we set up a reverse tunnel that will give us a public HTTPS URL that we will use only as a test hook in a controlled environment.
0x01.4 Reverse tunnels (localhost.run)
Reverse tunnels create a bridge between the local VM port and a public URL in HTTPS; This is how we expose Seeker that’s already running, just for testing.
In this experiment we tested one of the options that a The Hackers Choice repo has with tricks of this type, but you can experiment with others.
🔹 localhost.run with SSH
It is the fastest way because you don’t need to install anything additional, just use SSH.
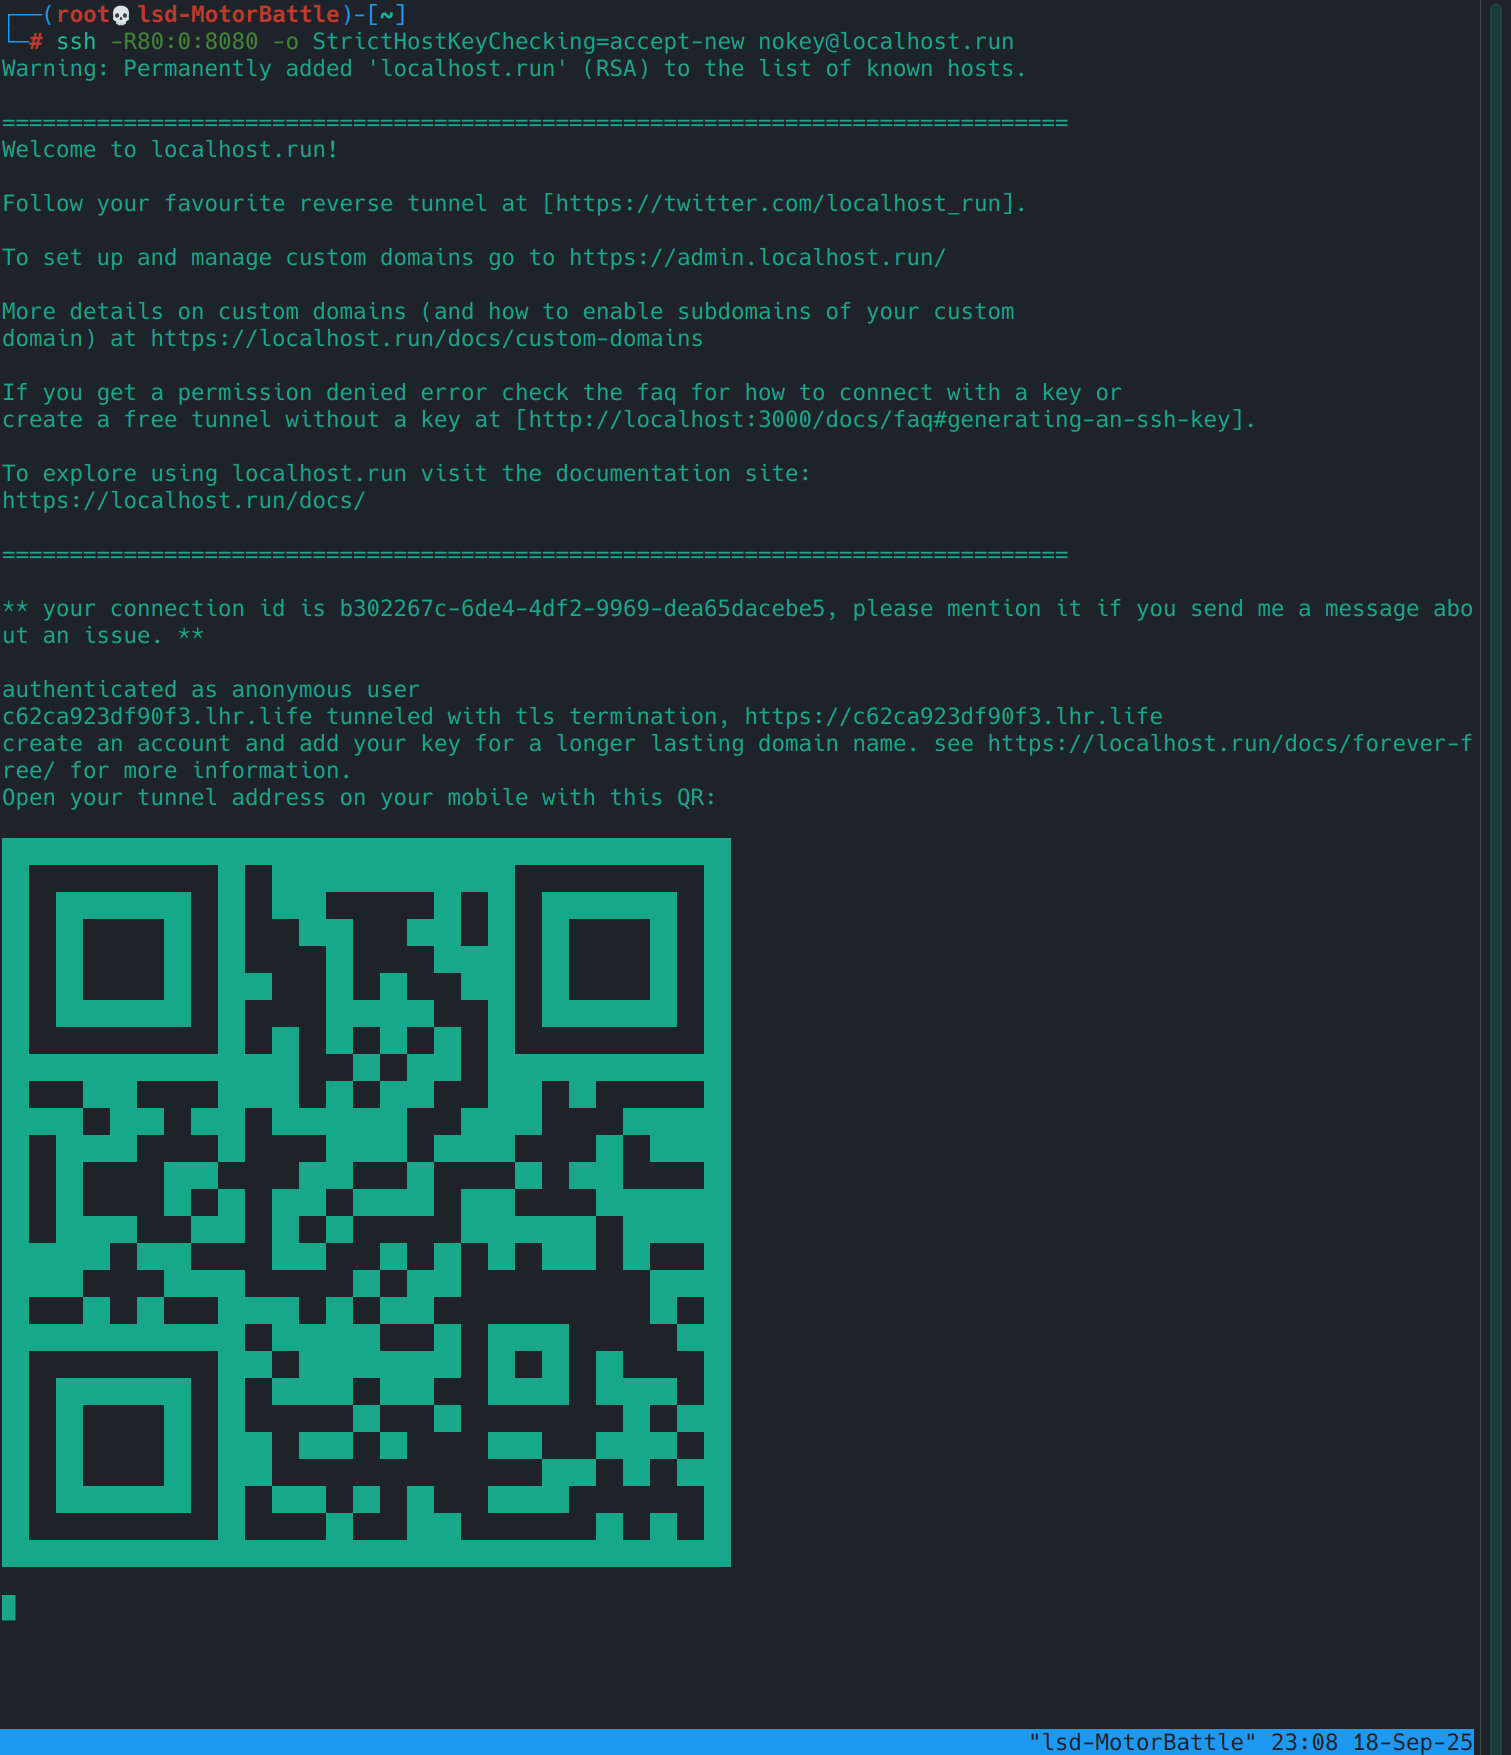
In tmux, in the panel that Seeker is running, you open the tunnel panel with Ctrl-b % (if you want it vertical) and you can use Ctrl-b o to move between panels. Here you just put the command:
ssh -R80:0:8080 -or StrictHostKeyChecking=accept-new nokey@localhost.run
What does this command do?
-R80:0:8080: asks the remote service to open port 80 and redirect it tolocalhost:8080on our VM.nokey@localhost.run: user “guest” to create the tunnel.StrictHostKeyChecking=accept-new: Avoid the key verification prompt the first time.
What you should see: A public https://randomsub.lhr.life URL that points directly to your local port.
This method has some pros and cons, on the one hand it is super easy to set up and does not install anything in the VM, but it may be that the service is unstable and limited, and it may also be that it changes the URL every time you run it, but It works for us for the experiment, so let’s go.
0x01.5 Seeker ready
Seeker was mounted and accessible via the tunnel’s public URL; In the tmux session we leave panel A with Seeker and panel B with the HTTPS tunnel. With the URL we can now open the instance from a clean browser or an emulator and see live what the template captures (coords if they accept, and/or metadata if they deny).
Tests
With the browser, if you are using a clean profile, open the public URL, here you should see the Seeker page.
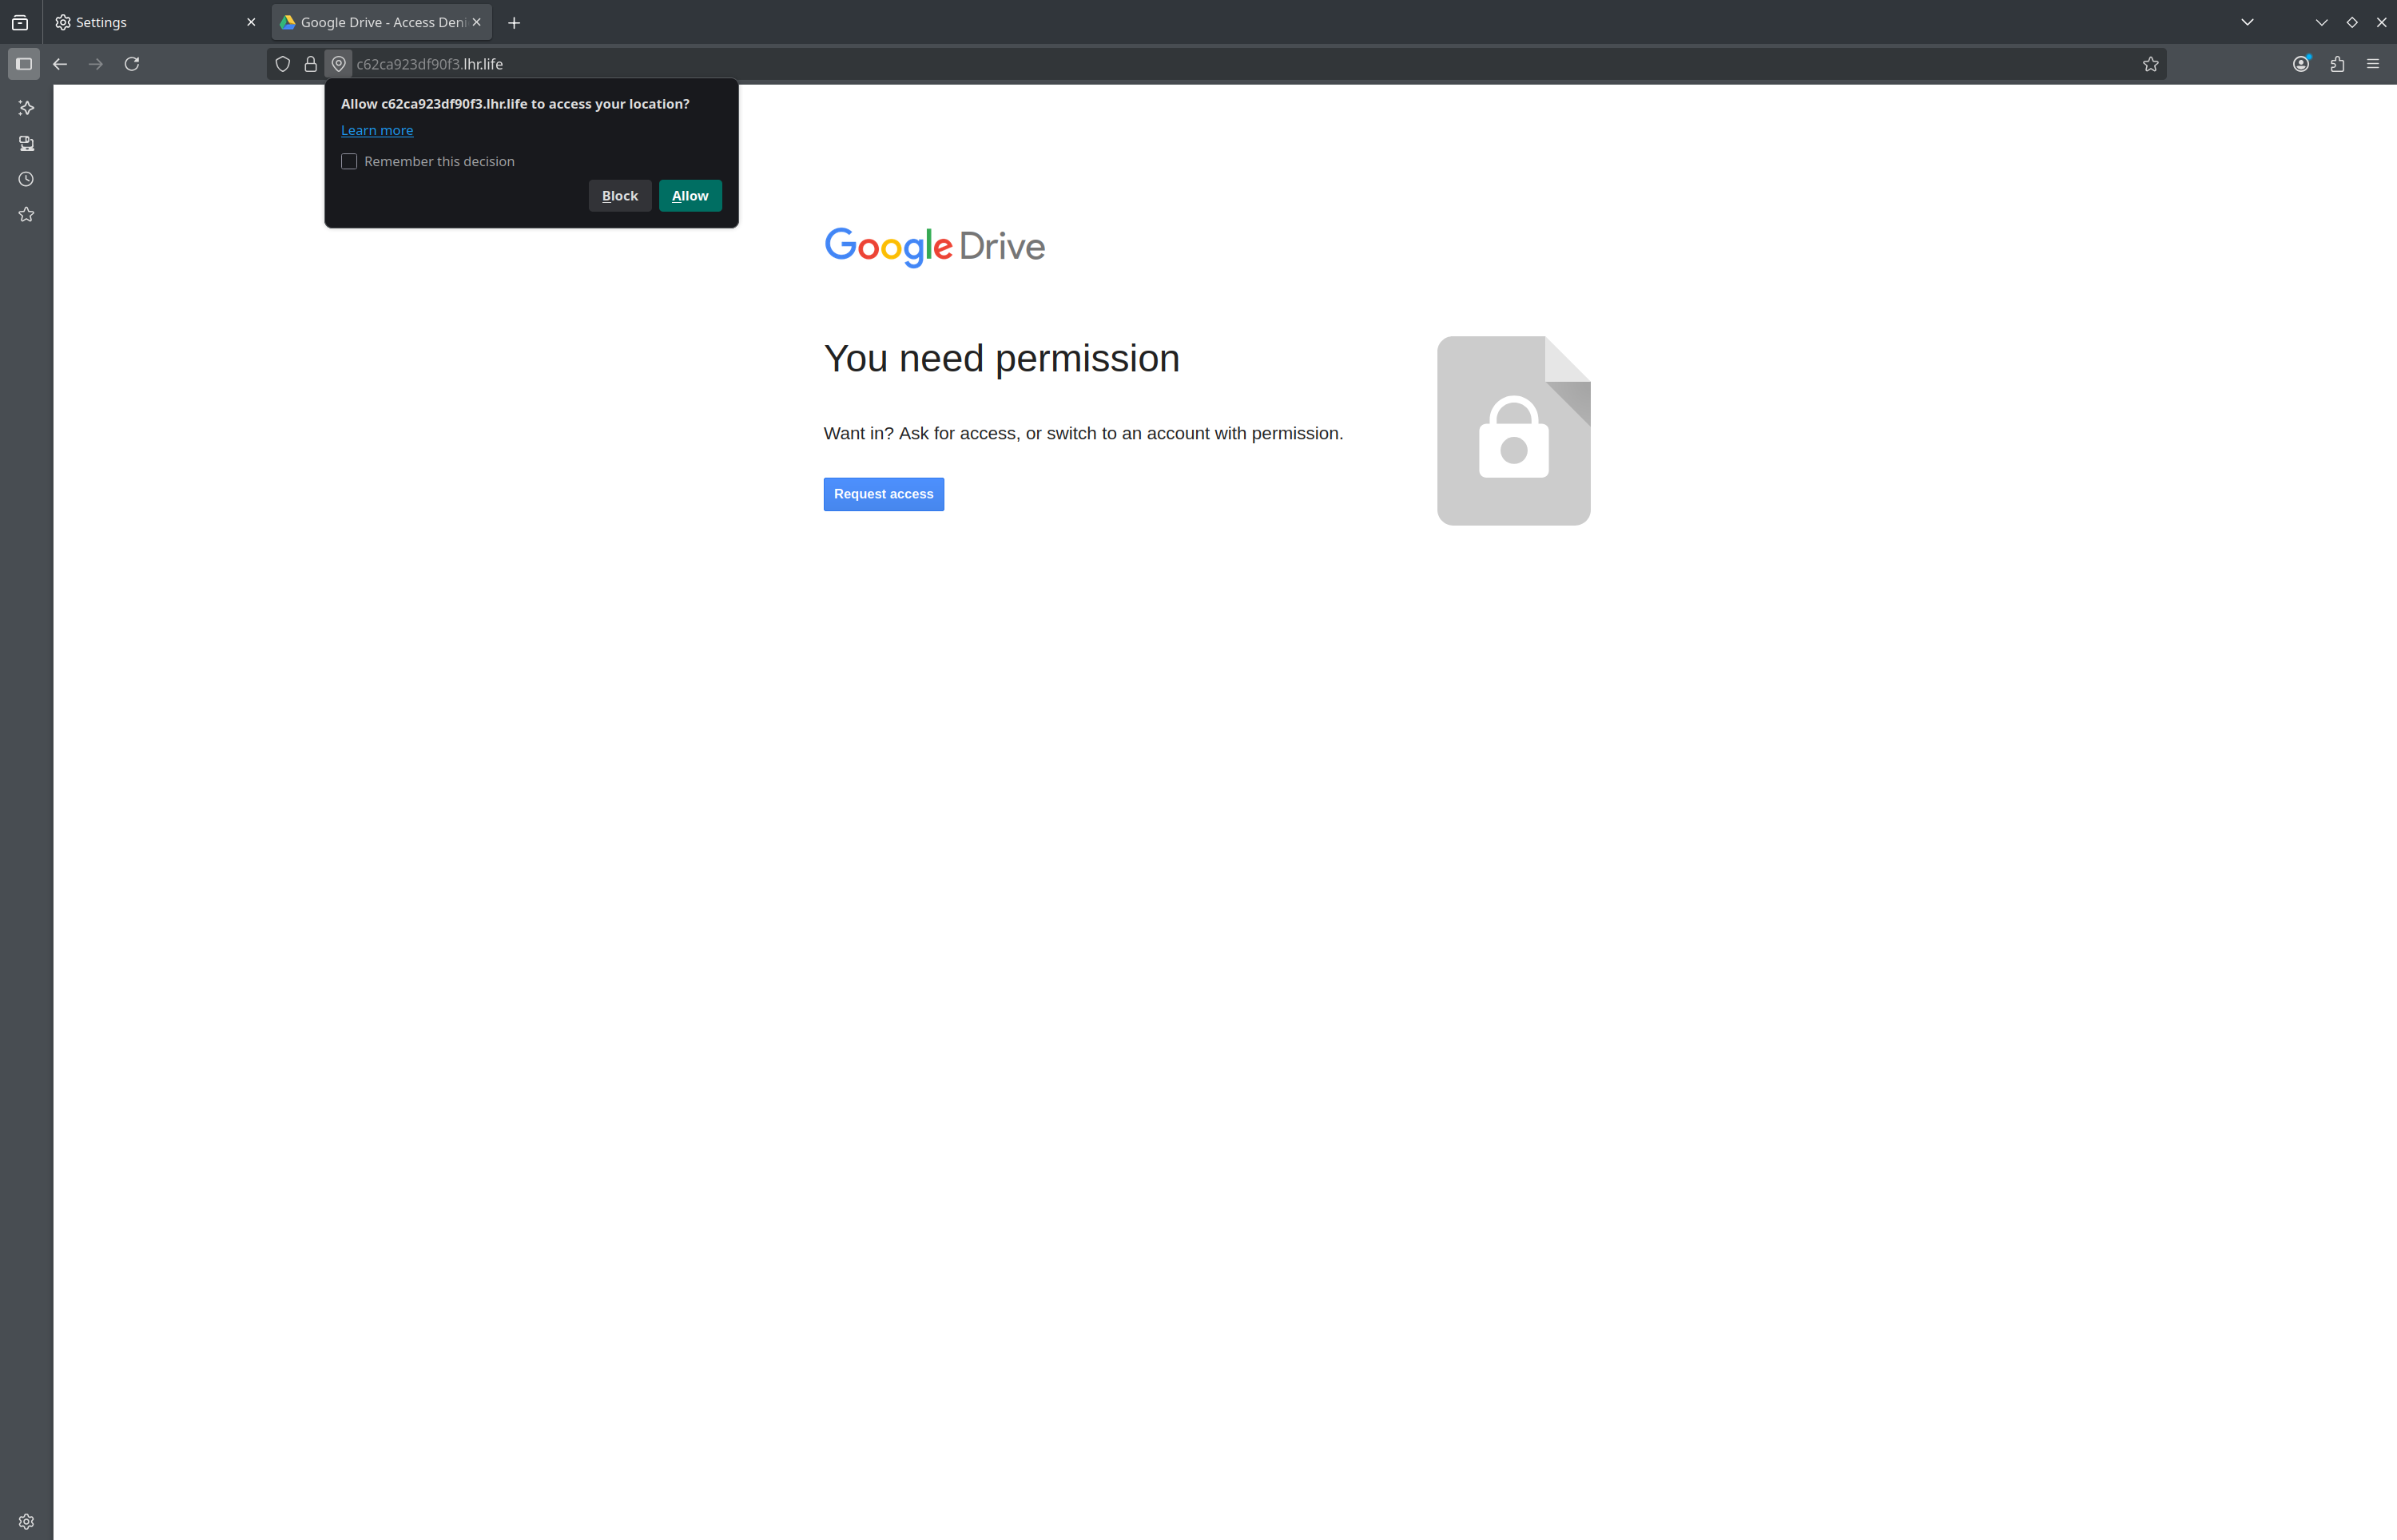
- If you accept location → Seeker will show the client’s public IP, user-agent, timestamp, coordinates (lat, lon) and precision in meters.
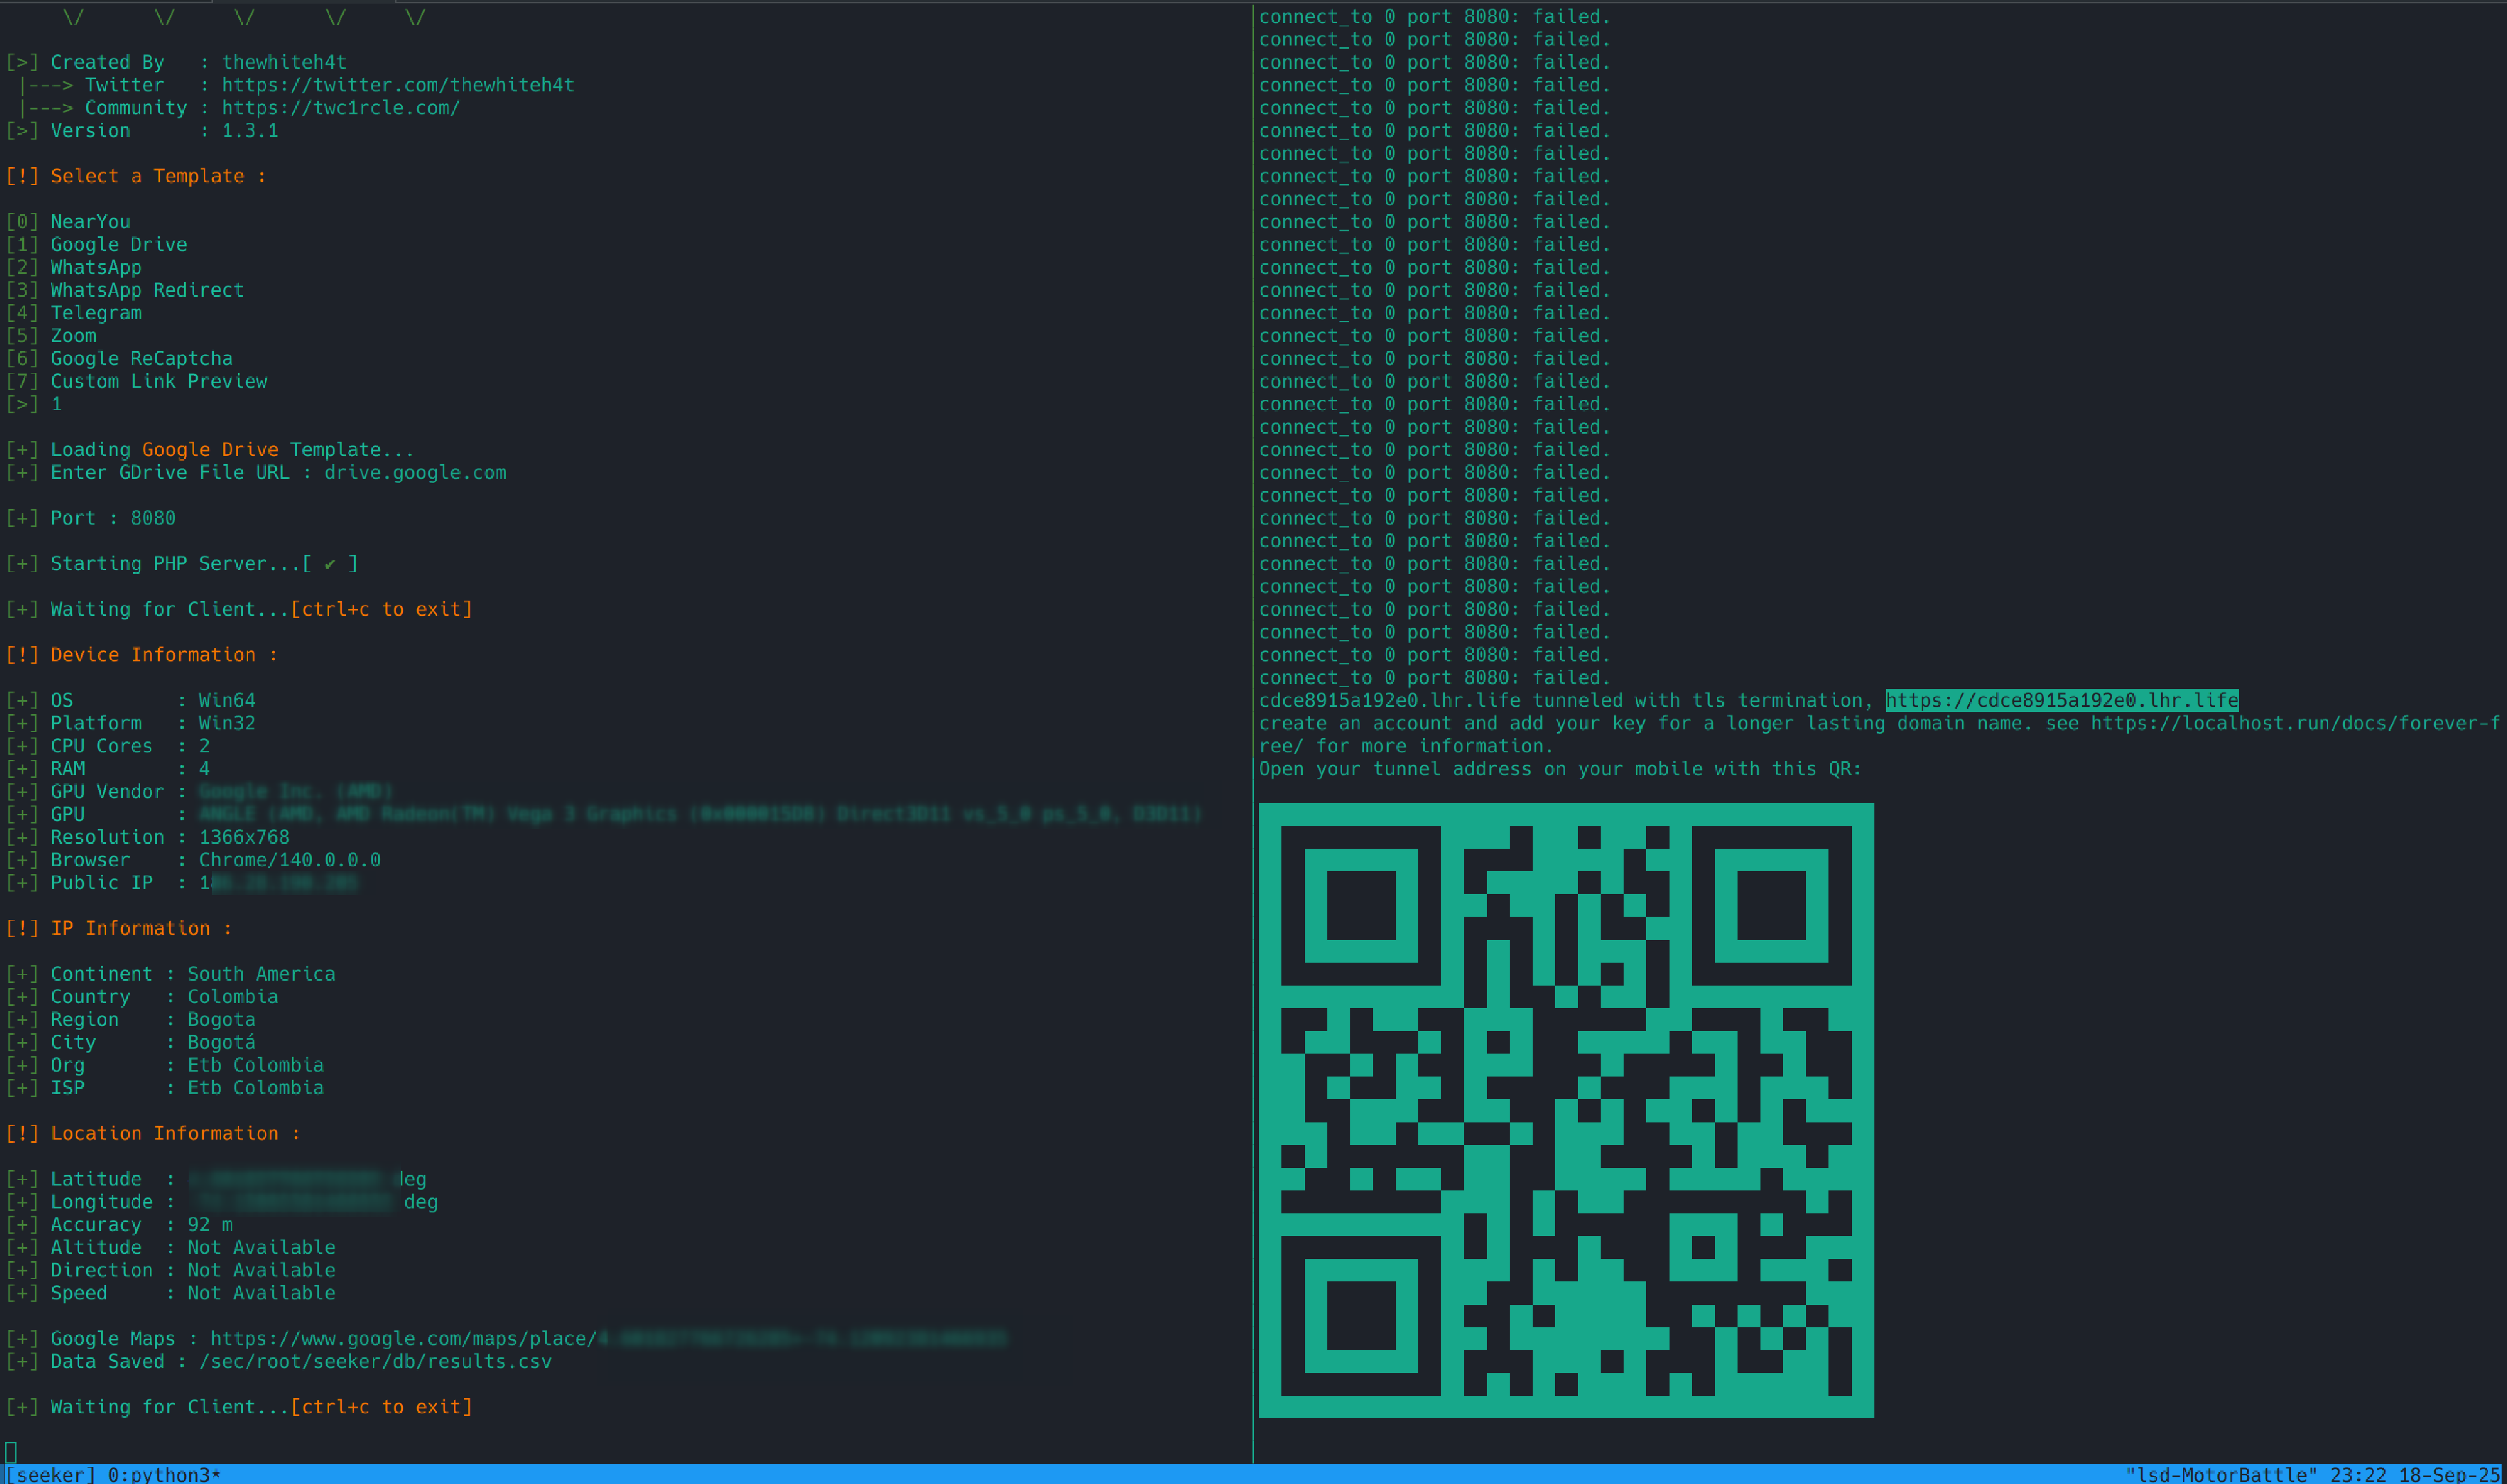
- If you deny location → you will see that no coordinates appear, but IP, user-agent and other metadata (headers) do. This confirms that even without permission there is valuable information.
From Seeker to hunting
Seeing Seeker work is just the first step. What we’re really interested in is getting fingerprints that we can reuse to hunt other instances: the favicon (/favicon.ico) acts as a mini-fingerprint for correlation; the HTML title usually gives away entire templates; HTTP headers/banners (Server, Connection, redirects) help filter out noise and group twinned hosts; routes and templates (JS/CSS, static paths) are traces that repeat and leave traces like breadcrumbs; and the certificates/TLS + IP/ASN combo gives us hosting context and possible operational clusters. With these artifacts we put together queries in Censys/Shodan and documented everything in Colander to generate export-ready IOCs —this is practical research, not casual curiosity.
Now, let’s get to work, first we go with OpSec and then to the fun, mapping.
–[ 0x02 OpSec ]–
Before you start searching, pause briefly. In this experiment,we are going to come across malicious infrastructure and we want to be ready to interact with it without giving away lab data or metadata. Our minimum recipe is: we take everything out by Segfault (THC) using a SOCKS5 via SSH and work with a dedicated browser with a clean profile. If we need to “look like” a phone, we chain an HTTP proxy with gost so that an Android emulator uses the same tunnel. It’s simple, cool and serves as a template for future experiments.
It is not the only way. Also, in our case we use a borrowed VM: we don’t control what is logged or monitored there, so for experiments with more dangerous infrastructure this setting might fall short, so always do an risk assesment —what a third party might see and if you mind them seeing it— and decide accordingly. There are alternative routes (VPN, Tor, containers, disposable VMs, etc.); We chose this one because it is quick to assemble and easy to reuse.
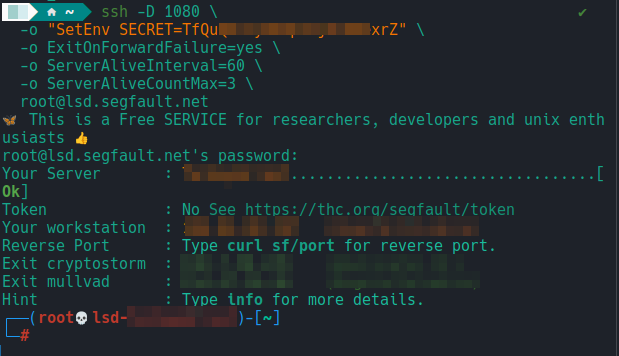
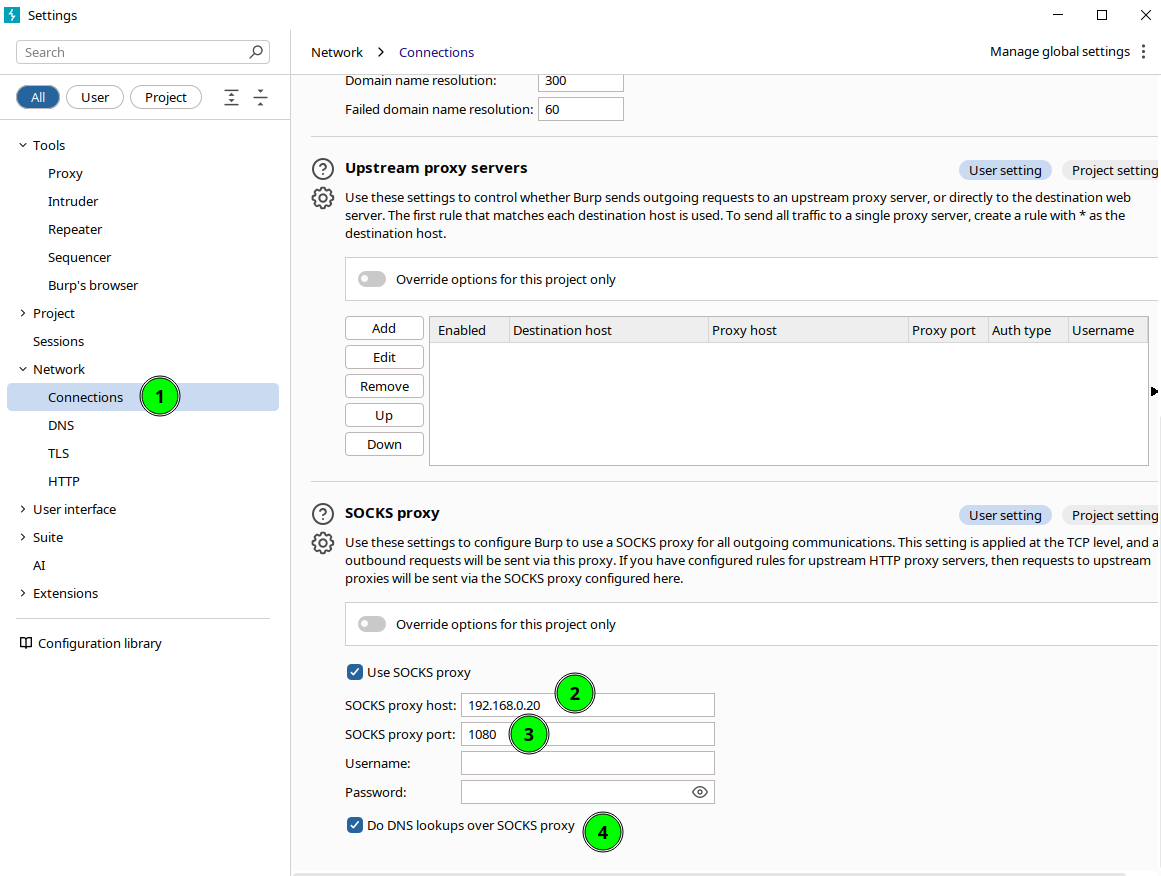
0x02.1 Connecting by segfault with SOCKS5 (SSH)
What it does: creates a local SOCKS5 proxy that tunnels your traffic to segfault. Thus, the destination sees the IP/ASN of segfault, not that of your lab network.
Command (minimum):
ssh -D 1080 -or "SetEnv SECRET=YourSecretKey" root@lsd.segfault.net
Command (robust, with keepalive):
ssh -D 1080 \
  -or "SetEnv SECRET=YourSecretKey" \
  -or ExitOnForwardFailure=yes \
  -o ServerAliveInterval=60 \
  -o ServerAliveCountMax=3 \
  root@lsd.segfault.net
-D 1080: Opens a SOCKS5 at127.0.0.1:1080.- Keepalive so the tunnel doesn’t fall silently.
0x02.2 Dedicated browser (clean profile) → SOCKS5
Idea: use a “clean” browser (new profile, no cookies/personal extensions) and point it to the SOCKS5 in the previous step. Important: activate DNS through the proxy to prevent leaks.
-
Firefox: Preferences → Network → Configure → SOCKS5
127.0.0.1port1080. Inabout:configactive:network.proxy.socks_remote_dns = true -
Chromium/Chrome: use a unique profile and define the proxy in the system options or via the command line if you need it, but remember that not all paths force DNS over SOCKS; If in doubt, use Firefox for this part.
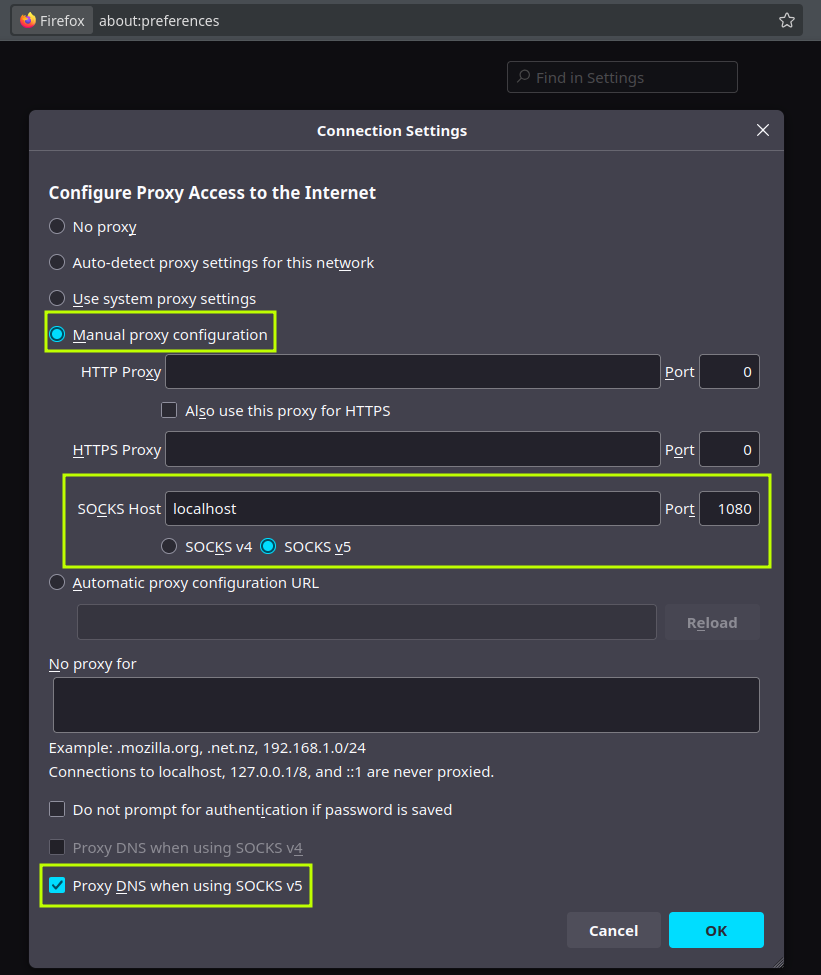
Quick fingerprint tip: Browser language and time zone should be consistent with your strategy. If you don’t need anything fancy, leave it at that.
(Optional) Intercept with ZAP/Burp
If you want to watch/edit traffic:
*In ZAP/Burp configure SOCKS5 → 127.0.0.1:1080.
- Make the browser point to the ZAP/Burp Local HTTP proxy (e.g.,
127.0.0.1:8080). ZAP/Burp → SOCKS5 → segfault.
0x02.3 Branch “mobile”: Android emulator with gost (HTTP→SOCKS)
What is gost? A lightweight tool (in Go) for convert/chain proxies. We use it to translate HTTP ↔ SOCKS so emulators (speaking HTTP proxy, not SOCKS) can take advantage of our tunnel.
HTTP→SOCKS local bridge (on your computer):
gost -L=http://127.0.0.1:8081 -F=socks5://127.0.0.1:1080
-L=http://127.0.0.1:8081opens a local HTTP proxy at:8081.-F=socks5://127.0.0.1:1080chains it to the SSH SOCKS5 proxy.
Android emulator (AVD) Configure Wi-Fi → Manual Proxy:
- Host:
10.0.2.2(the emulator sees the host like this; in Genymotion it is usually10.0.3.2) - Port:
8081
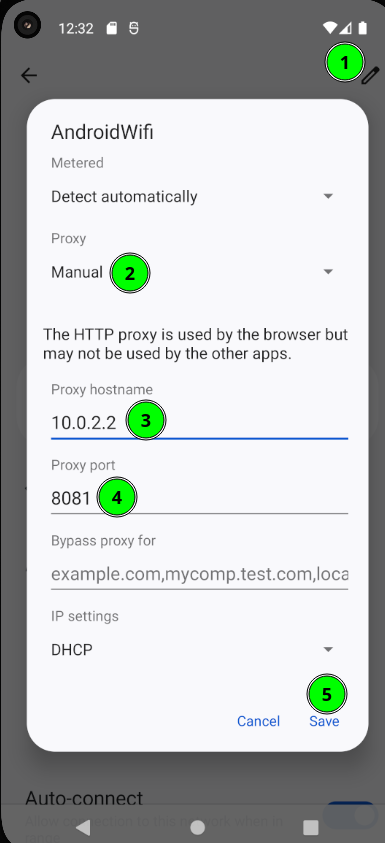
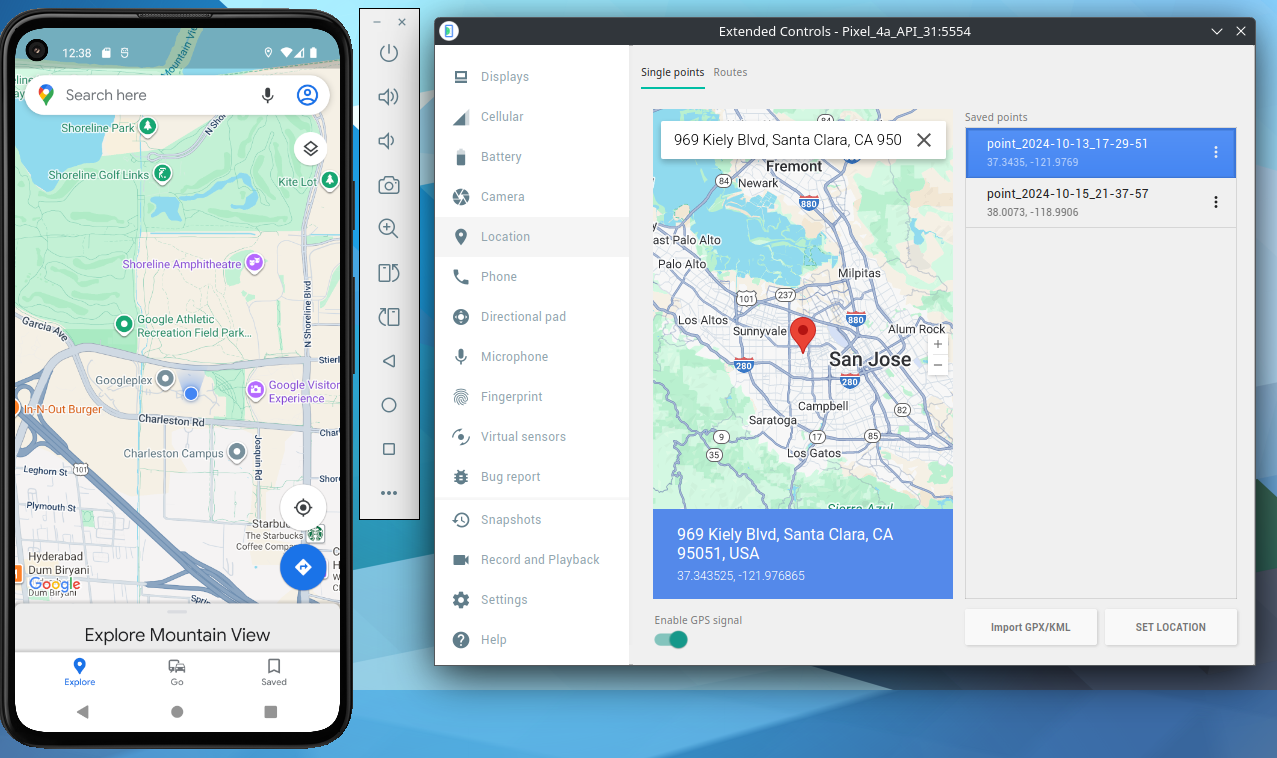
Simulated location (optional, very useful with Seeker) Use the emulator tools to set coordinates and test how Seeker records location without exposing the real one.
0x02.4 Diagram (two branches, clear)
                 [Laboratory computer]
                           │
                 SSH -D 1080 (SOCKS5 local)
                           │
            ┌──────────────┴───────────────┐
            │                              │
            │ DESKTOP ROUTE                │ MOBILE ROUTE
            │ (Clean Browser)              │ (Android Emulator)
            │                              │
     Browser → (ZAP/Burp optional)         Emulator
            │                              │
            │                     gost HTTP :8081 → SOCKS5 :1080
            └──────────────┬───────────────┘
                           │
                        segfault
                           │
                Seeker Infrastructure
Closing notes
With this chain, *everything comes out through segfault; your lab network doesn’t show its head.
- The dedicated browser avoids mixing cookies/extensions/language/zone in your daily life.
- The mobile branch with
gostlets you test “as a phone” without exposing the host and with simulated location. It is our recommendation for this experiment. - If your case asks for something else (VMs, Tor, VPN), change it. This is our base recommendation because it is short, practical and reusable for what is to come.
–[ 0x03 On the hunt (favicons first) ]–
First, the tools. Censys and Shodan do not “read” pages like a normal search engine: they index service metadata (banners, headers, certificates, HTML titles, favicons…). That’s why they are perfect for us here: Seeker recycles templates with very recognizable favicons and titles; If you catch one, it is common for several more to come out. For fine queries, Censys exposes a field-level search language (CenQL), and yes, you can filter by favicons.hashes or html_title; Shodan has its own syntax.
Access levels:
- No account: you browse little.
- Free account: more results, but with credits and visible limits (open extra pages, use API, etc.).
- Paid: much broader and, above all, historical quotas: see “when” something was observed, compare states over time, etc. (useful for correlating campaigns). Here we will not use historical data, but it exists and is gold in long investigations. For Shodan, access also goes through query credits (filters,etc… spend).
Mini-tip: In Shodan, the filter by favicon does not use SHA-256; use MurmurHash3 (mmh3) on the favicon. Don’t mix the hashes.
0x03.1 Starting point: favicon of the reCAPTCHA template (with Censys)
Let’s start with a small clue with big traces: the favicon of the Google reCAPTCHA template in Seeker. The idea is to get the SHA-256 from the template favicon and search for it in Censys (without an account).
What is a favicon? The favicon is the little icon you see in the browser tab and in bookmarks. Technically it is a small file (ICO/PNG/SVG) that the site serves (typically
/favicon.icoor referenced in the<head>). Since many templates reuse the same favicon, their hash becomes an easy “mini-fingerprint” to search and correlate between instances (ideal for over-recycled hunting like Seeker’s).
$ cd seeker/template/captcha
$ ls
anchor.html css favicon.ico fonts images index_temp.html js
$ sha256sum favicon.ico
4673c3ef82f32e37d0021d3683b5c132dbab0942e7137427fc9716235289c678 favicon.ico
$
With the hash ready, in Censys (https://search.censys.io/) we search like this (use the prefix sha256: as is):
services.http.response.favicons.hashes="sha256:4673c3ef82f32e37d0021d3683b5c132dbab0942e7137427fc9716235289c678"
That field exists and accepts “sha256:<hex>” as a value; If in doubt, open any host and check Censys field names in its panel.
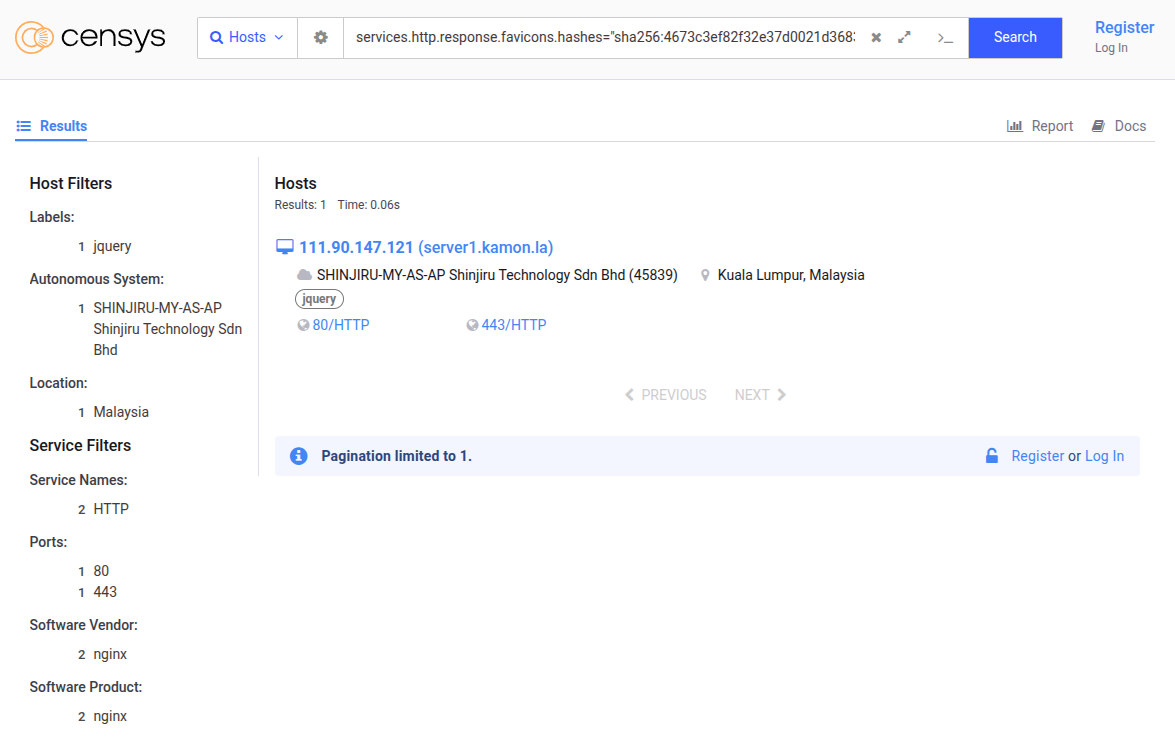
0x03.1.1 What we saw in the first shot?
In the instance we found (which we will use as an example) Censys showed that the Seeker service was last observed on September 4, 2025, while other services on the same host are still active at the time of writing (10 days later). That temporal contrast is just the kind of clue that helps understand whether they turned off, switched, or tuned anything.
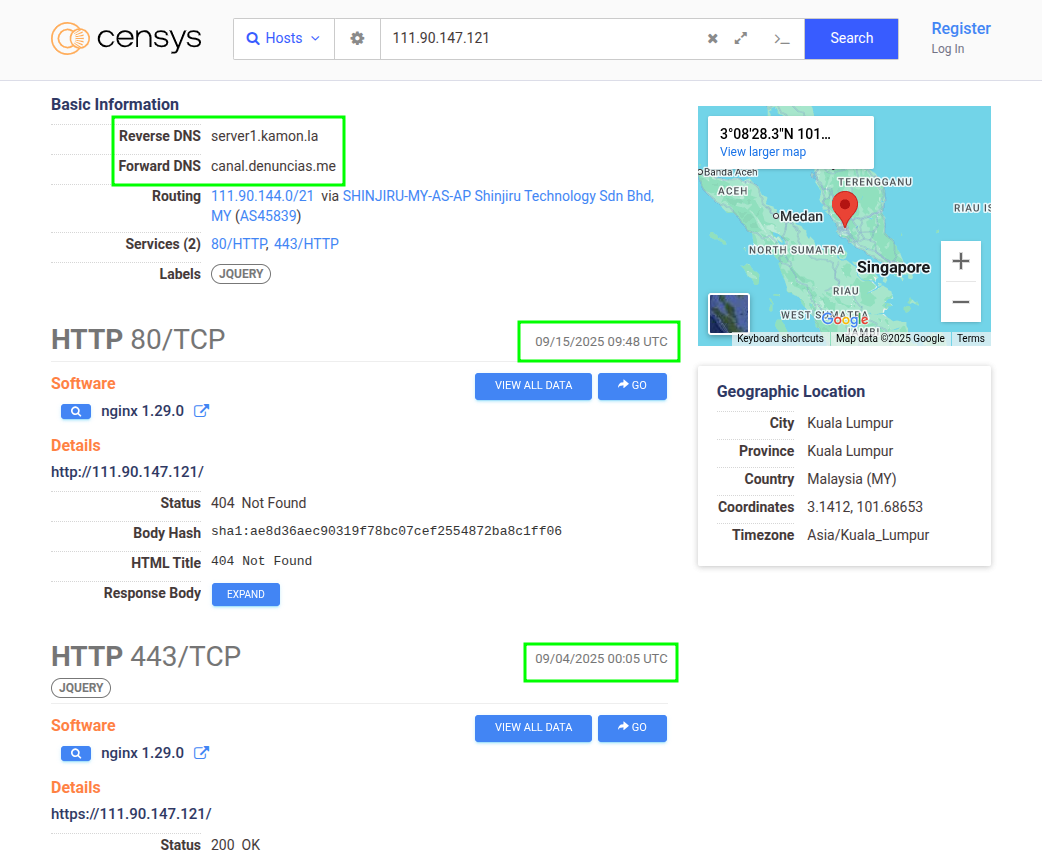
In that same host, two associated domains appeared. One of them —canal.denuncias.me— interests us especially because of the Hispanic context. We take note (IP, domains, ASN, ports, any redirects you see in the HTTP response). We leave the organization of this data for the next chapter.
0x03.1.2 Pivot without losing the thread: from favicon to title (reCAPTCHA)
When the favicon is gone (or disappears), the hash stops working. There it’s time to change tracks: the HTML title.
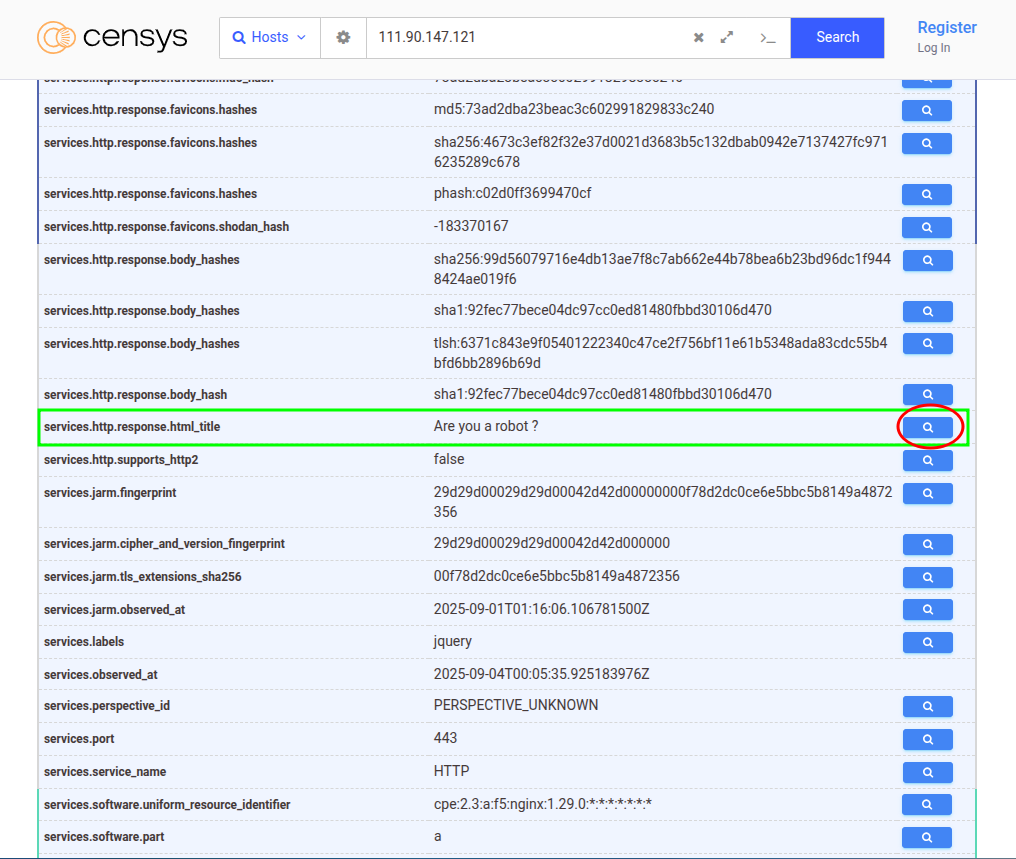
- On Seeker’s service tab, click “View all data”.
- In the table, locate the
html_titlefield (it should look like this):services.http.response.html_title = "Are you a robot ?" - To the right of that value is a magnifier glass. Click on it, and Censys will set up a search for that same title throughout its dataset.
- Execute. Another instance of Seeker reCAPTCHA will appear. This one didn’t come out with the favicon because it doesn’t have one (or it was deleted), but the title gives it away.
If you prefer to run it by hand:
services.http.response.html_title="Are you a robot\?"
(The html_title field is searchable; Censys documents it and you can use quotes for exact matching).
Methodological note: In our initial run we found the host “B” by favicon. When revalidating for this write-up it no longer appeared: the favicon had disappeared. With historical data (paid) we could compare the change over time. We leave it as a reasonable hypothesis, not certainty.
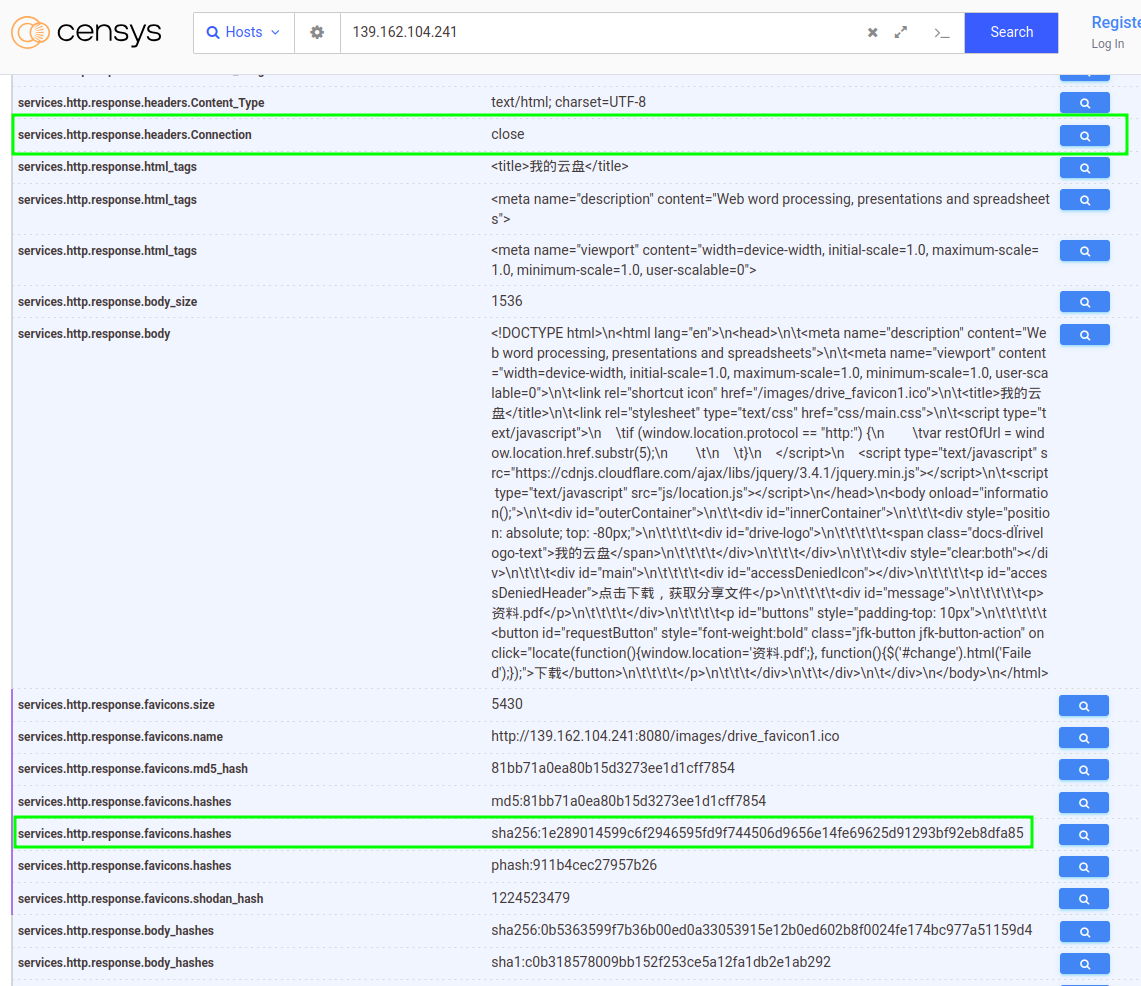
0x03.1.3 Tune (when the favicon “repeats too much”)
If your hash returns too many sites (including legitimate ones), add traits that you have observed in real instances: headers, title, typical paths. For example, when we search for instances of the Google Drive template we find not only instances of Seeker but others that make noise in the results. In our case, we have observed that in Seeker instances the “Connection” header of the response is always in “close”. Most non-Seeker hosts typically have this header in “keep-alive”. Combining known favicon + header can narrow the search to Seeker only:
services.http.response.favicons.hashes="sha256:1e289014599c6f2946595fd9f744506d9656e14fe69625d91293bf92eb8dfa85" and services.http.response.headers: (key: `Connection` and value.headers: `close`)
(Exact field names may change by dataset; copy them as they appear on the host tab.).
0x03.1.4 What to save while hunting and why?
Each match gives you pieces: IP, domains, ASN, ports, title, redirects, geography. With that you can contextualize: where is the server? What string/title does the template suggest? Does it point to a specific gateway? Thus, hypotheses of campaigns are raised or IOCs that are valid for more countries are recognized (in our example, the Spanish domain is an IOC of regional interest).
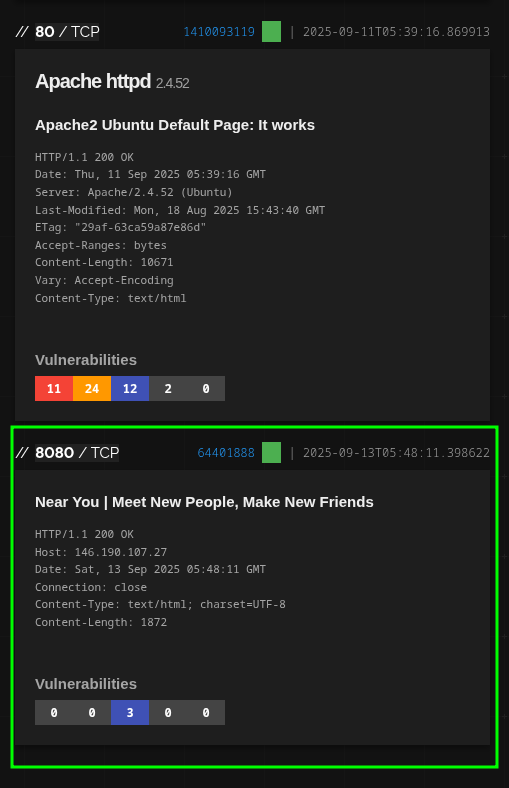
0x03.2 On the hunt (part two: Shodan, “Near You” without favicon)
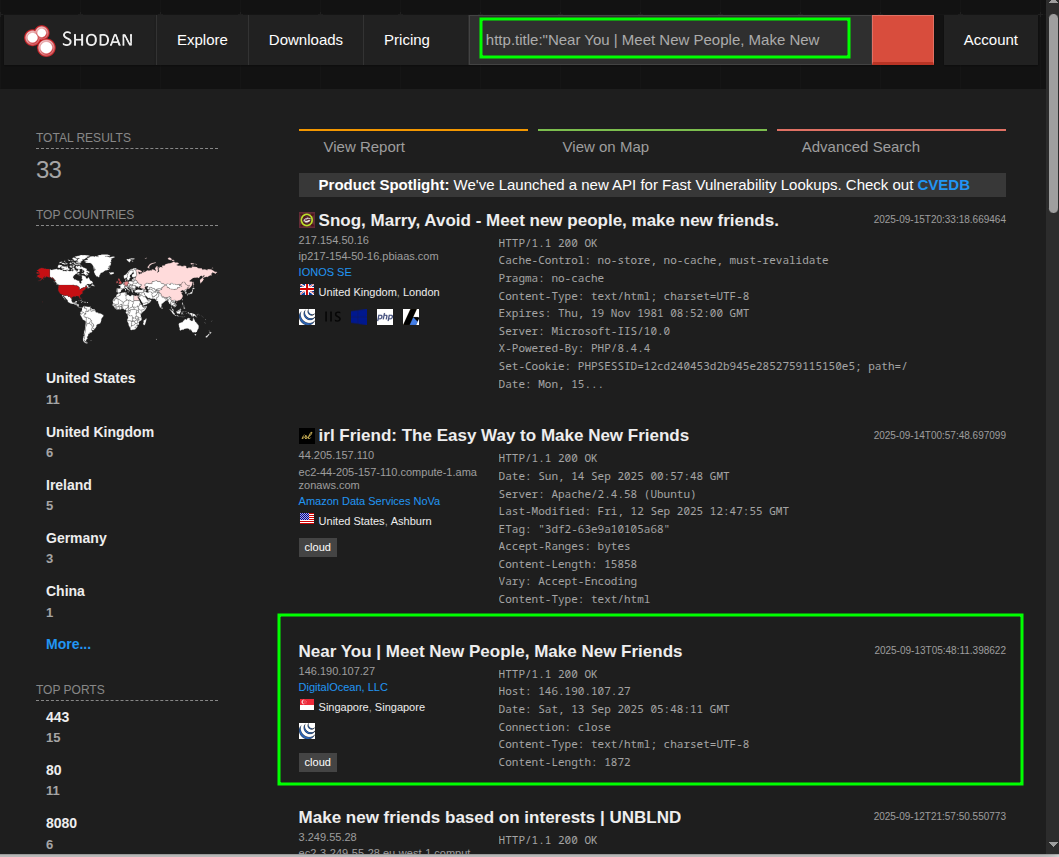
We continue with the same logic but now on the Shodan side that this time we will use with a registered user but without paying. We are not going to re-explain the tool: straight to the point with Seeker’s “Near You” template. This bug is minimalist (it starts without asking for images or extra data), it pretends to be a service “based on your location” —just enough to tempt the victim to authorize geolocation— and, key for us because it does not come with a favicon. So we enter by title.
Remove the title from the template (once, from code)
First we confirm the <title> of the template “Near You”.
$ cd seeker/template/nearyou
$ ls
css index_temp.html js
$ grep "<title>" index_temp.html
  <title>Near You | Meet New People, Make New Friends</title>
$
With the title validated, we look for it in Shodan as is:
http.title:"Near You | Meet New People, Make New Friends"
Noise is going to come out, it’s normal, there are innocent services that match by text. What interests us is the host where the title fits literally and, when opening the tab, we find the port/service where Seeker runs.
0x03.2.1 Clean pivot inside Shodan
Above the service block you will see a green badge. Click there and several hashes calculated by Shodan for that banner are displayed. The one we are interested in is http.title_hash. Click on that hash, now Shodan automatically sets up a search filtered by that title fingerprint. Result: you are left with only pages that share that title —there appears another instance of Seeker “Near You”— and, of course, another very suspicious one that looks like phishing from another family.
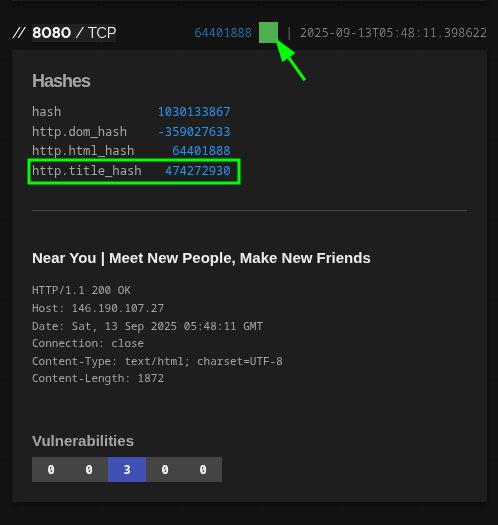
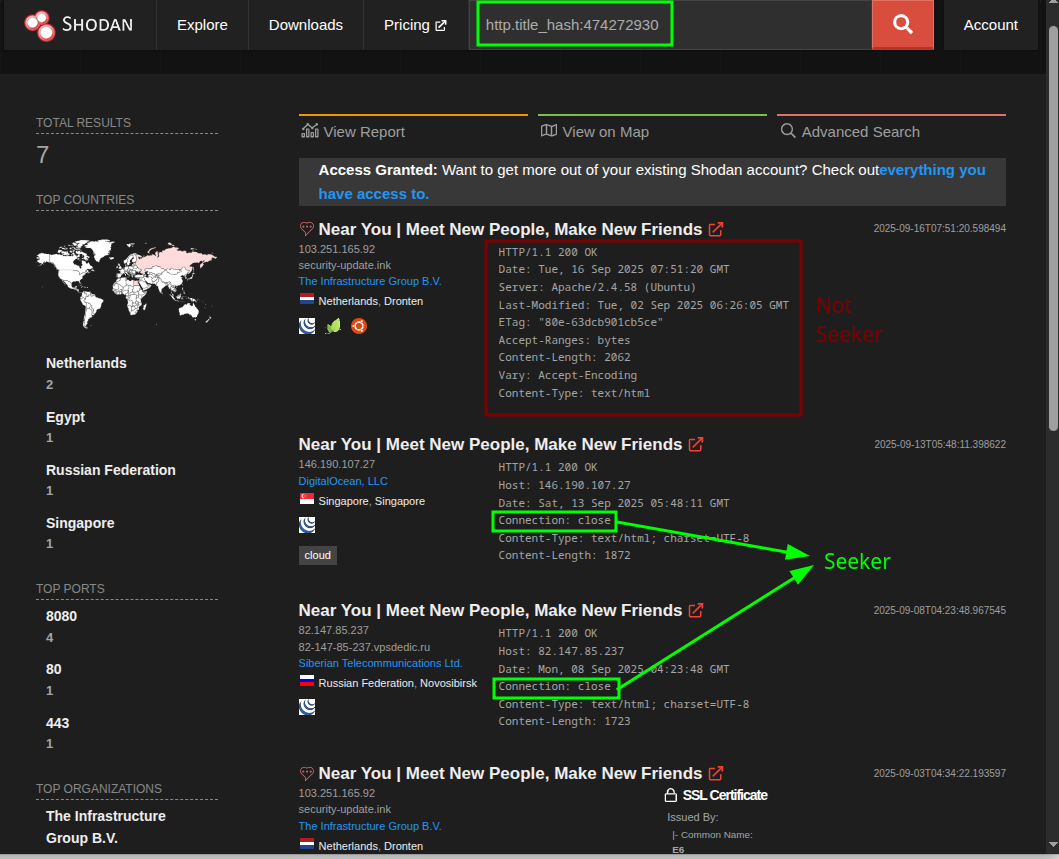
With that, we learn two things: (1) when there is no favicon, the title is still a solid hook; (2) pivoting from the detail of a service to its fingerprint (hash of the title), we reduce the noise to almost zero without leaving the interface.
0x03.2.2 What do we keep?
Nothing fancy: host, port, ASN, domain if any, and any interesting redirects or routes you see in the response. The fine organization goes in the next section; For now, just make sure each find has its minimum notes.
0x03.3 One more step on the context (without blowing our minds)
This is where it stops being “looking for strings” and real intelligence begins. With very little you can:
- Tie content to campaigns: If the phishing page always redirects to a certain specific form, domain, or landing, you already have an operational link. That is enough to raise an alert for a specific group or region.
- Look at the map: filtering by country/ASN/organization reveals whether things are concentrated in specific suppliers or areas. If the same title appears in repeated ASNs, it is a shared infra track.
- Certificates/TLS (for other write-up): strings, emitters and cert traces are usually gold to join dispersed infra. We don’t touch it here so as not to open another chapter.
- Time: historical (usually paid) lets you see when a trait appeared or disappeared. That helps sew campaigns and, if there are previous posts, even plausible attribution. We won’t use it here, but it’s the tool you’ll want when this escalates.
We close with the same invitation as always: this barely scratches the surface of what Censys and Shodan allow. We don’t come to invent anything: we come to show how we are doing it while we learn. What we hope is that it piques curiosity and attracts attention. Adversaries play seriously; We have to respond the same.
–[ 0x04 Document findings in Colander ]–
Colander, for us, is the “field notebook” where a case stops being a bunch of loose tabs and notes and becomes navigable knowledge. It’s part of the PiRogue Tool Suite (PTS) —yes, the same people from PiRogue— and is intended for digital investigations and case management: you organize events, artifacts, observables, you connect them in one case, and from there you can generate reports, feeds and even rules. We won’t do a tutorial here; If you want to learn how to use it well, you have to go through the official doc of PTS/Colander (it’s worth it).
This chapter is about applied methodology: how we take what we find “in the hunt” and enter it into to Colander.
Before typing: observables vs. IOCs (and healthy doubt)
In this experiment with Seeker we saw a lot of IPs, URLs and ports (the 8080 is Seeker’s default), but when Seeker is used “in production” there is usually an HTTPS tunnel/bridge in front. So…http://IP:8080/ is it an IOC or just an observable? Short answer: depends on use.
- An observable is something that you saw as is (an IP, a URL, a title), useful for searching/correlating.
- An IOC suggests actionable malice (serves to block/alert with low risk of false positives).
If someone blindly applied a block based on your IPs/URLs “lab”, it could affect legitimate hosts (e.g., a server that temporarily hosted a test instance or an endpoint of a CDN). The line between “observable” and “IOC” is drawn with context (we return to that below). Our rule of thumb: we raise observables first, we tag, and when there is sufficient evidence, we promote some to IOCs.
How we are modeling it (our flow, not “the correct one”)
For this work we decided to create in Colander a threat (Threat) for each Seeker template (reCAPTCHA, “Near You”, Telegram, etc.) and associate the observables with those threats. Sometimes a host served more than one instance with different templates; in those cases there are cross relationships and we prefer not to force a story:
- If the link was clear, we hung the observable from the corresponding template.
- If it wasn’t, we associated it with a “generic” instance of Seeker and left a note of the ambiguity.
The truth? Mental gymnastics. There is no single perfect scheme. We learned that the only way to solve these dilemmas is to do it: get your hands dirty, try, change labels, look again. This chapter shows a concrete example (that of the domain in Spanish that interested us) so that the “how” and “why” behind each association can be seen.
The example that we are going to put into Colander
We have previously created a case in Colander and a phishing threat for “Seeker captcha”
In the initial hunt we did with Censys we found a very interesting host that, among other things, had a domain in Spanish that caught our attention: canal.denuncias.me. Let’s see what this host looks like in Censys:
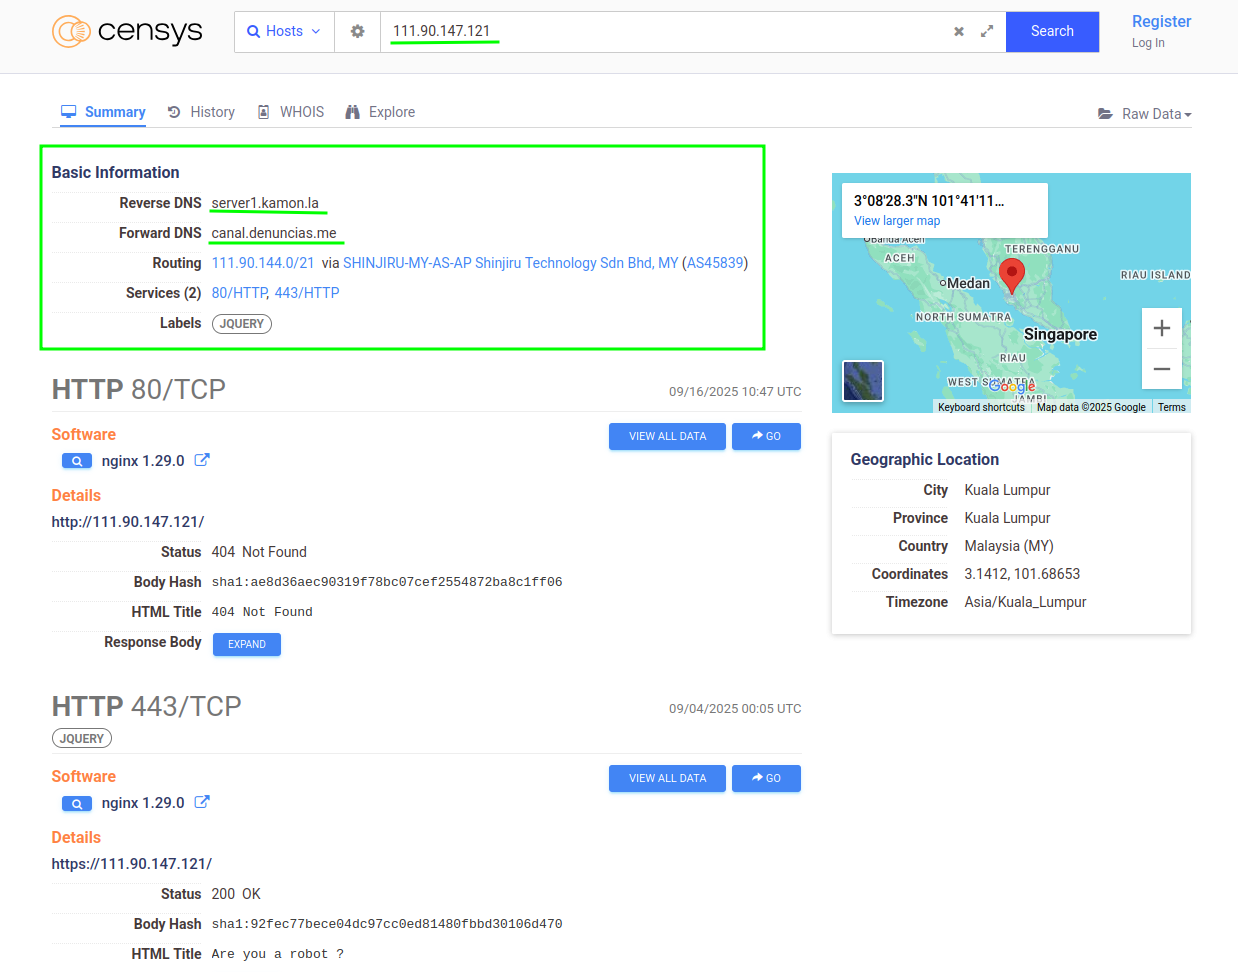
The first thing we can do is use Colander’s “investigate” function and see what result it gives us by searching for the IP:
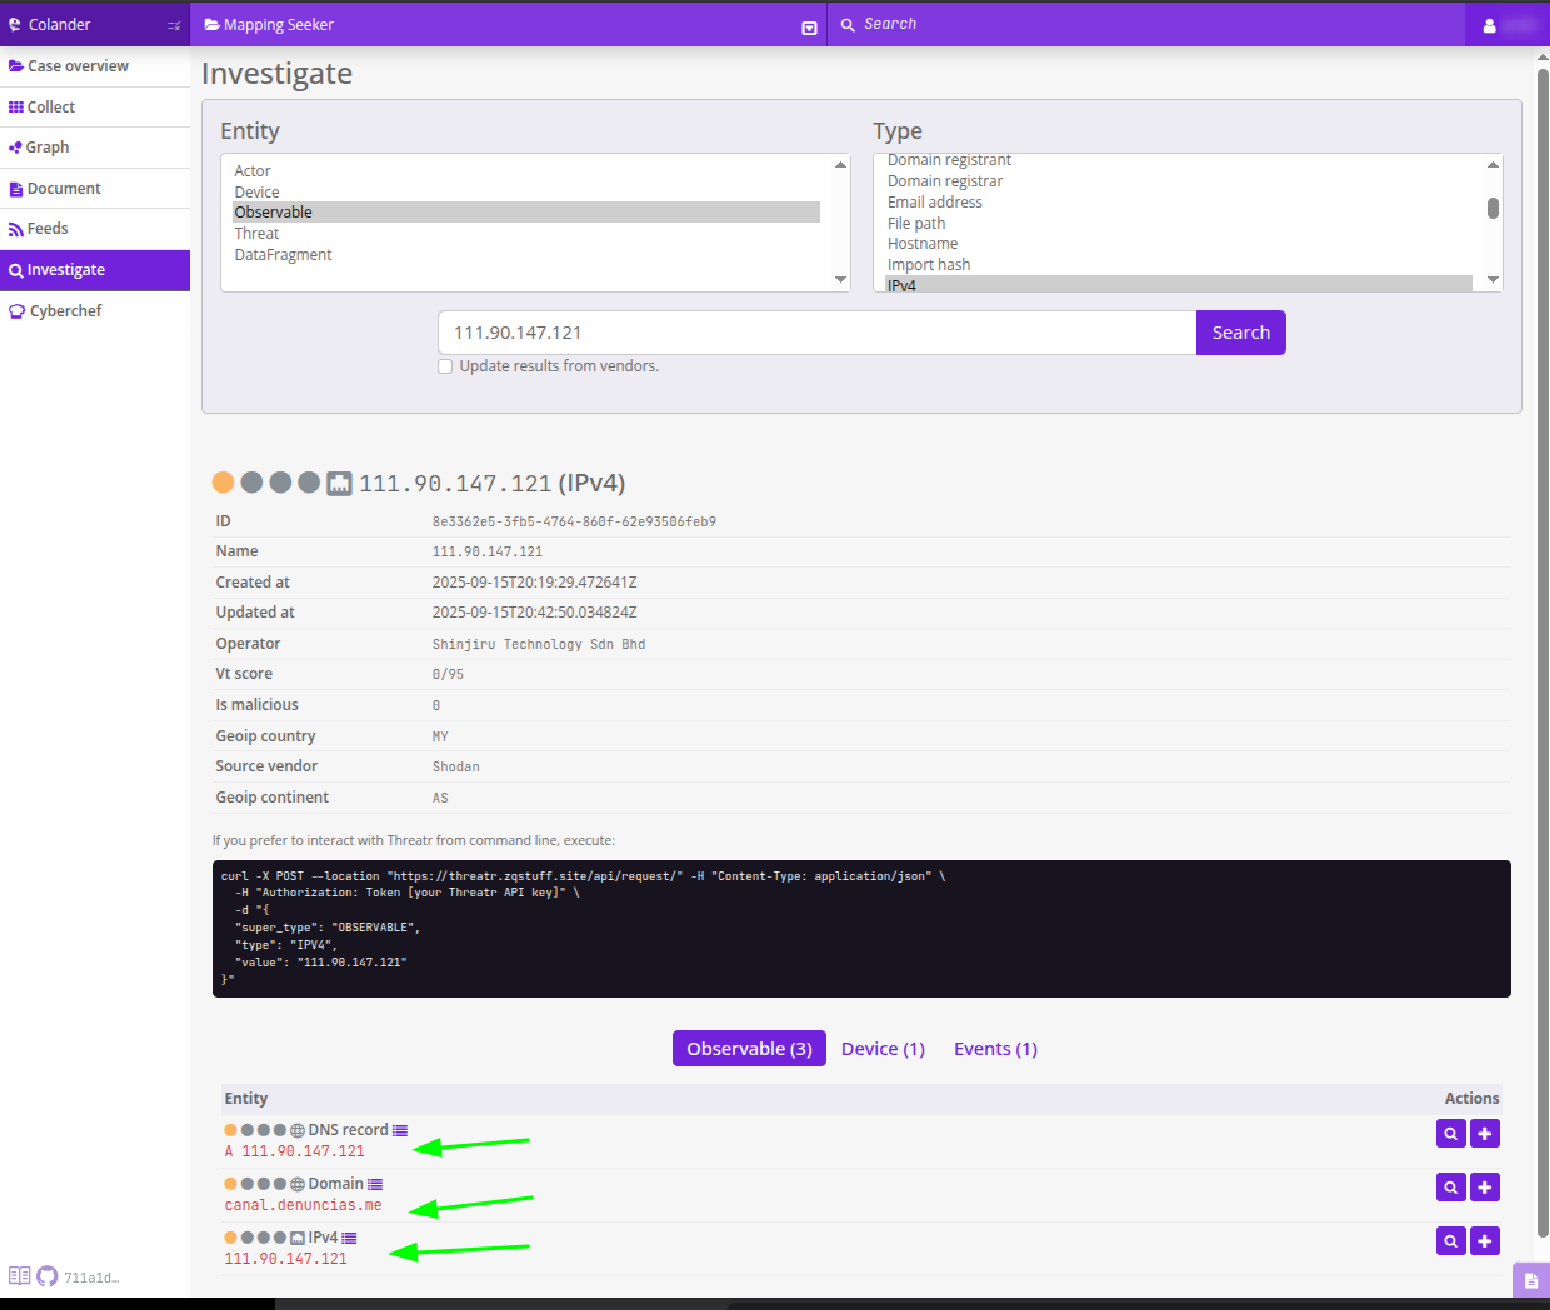
At the bottom we can see that we obtain 3 observables (among other things), including the domain that interests us most. If we click on the + next to the observables we can add them to the case and with the advantage that the data extracted by Threatr will also be uploaded (a service brought by Colander that connects with other threat intelligence platforms to obtain more information about the observables we investigate, includes Shodan!).
Also, as in Censys, we have the magnifying glass to pivote, in this case we can investigate the domain and then add it to the case.
But we have another important piece of information here, a “reverse dns” that does not appear in the observables that the IP investigation in Colander showed us, we can use the same investigation tool and see what Colander finds for that domain, let’s see:
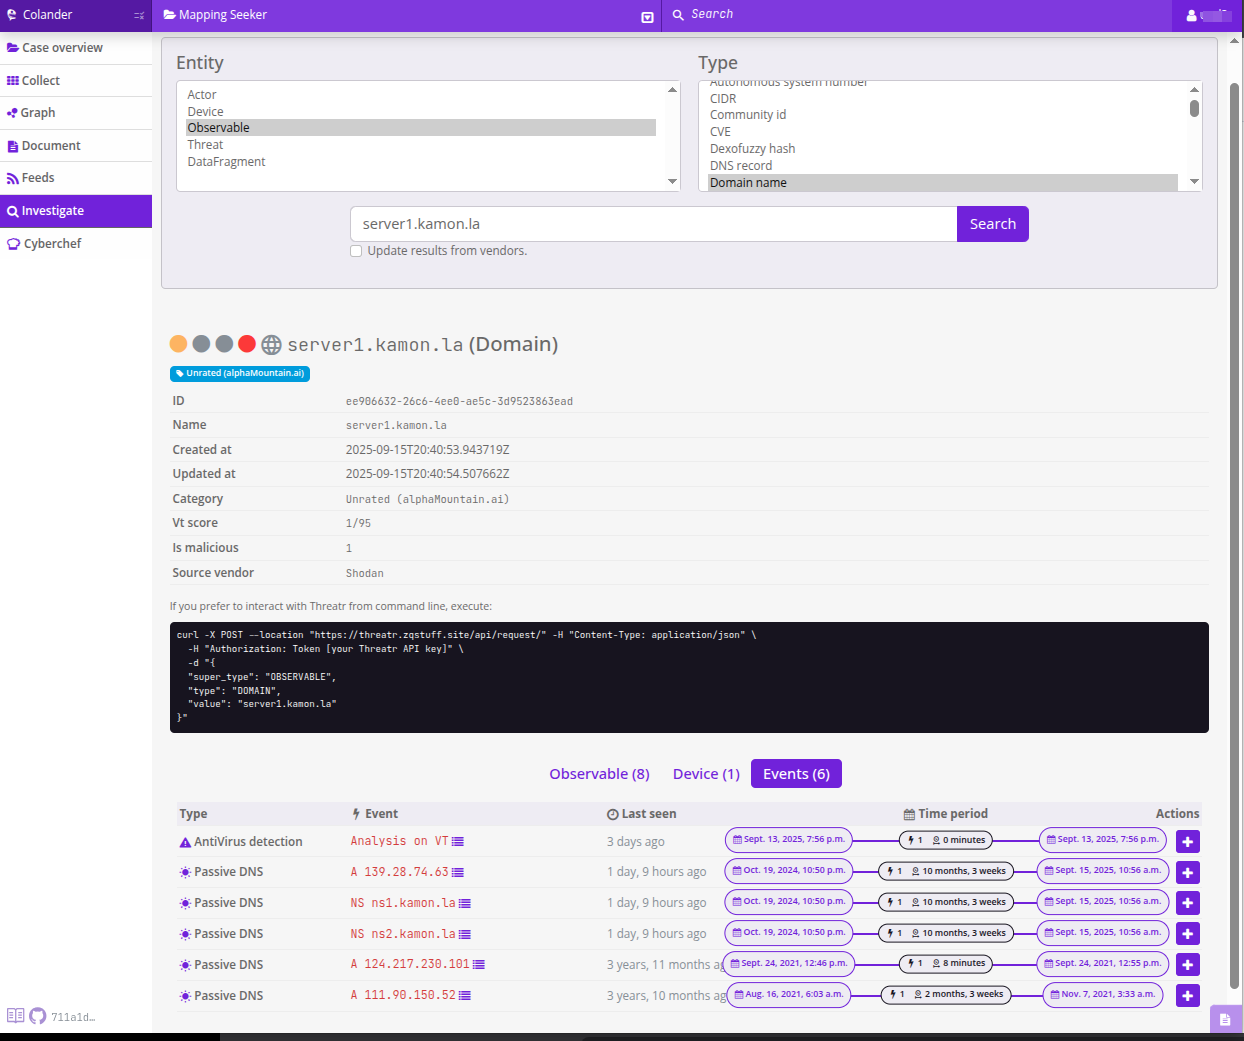
Although we also have several observables, in this case we are seeing the “events”, the first shows us that in a VirusTotal analysis, 3 days ago, this URL was detected as malicious, that is, someone else came across this recently, interesting.
In this case we add the domain and event to the case using the + icons.
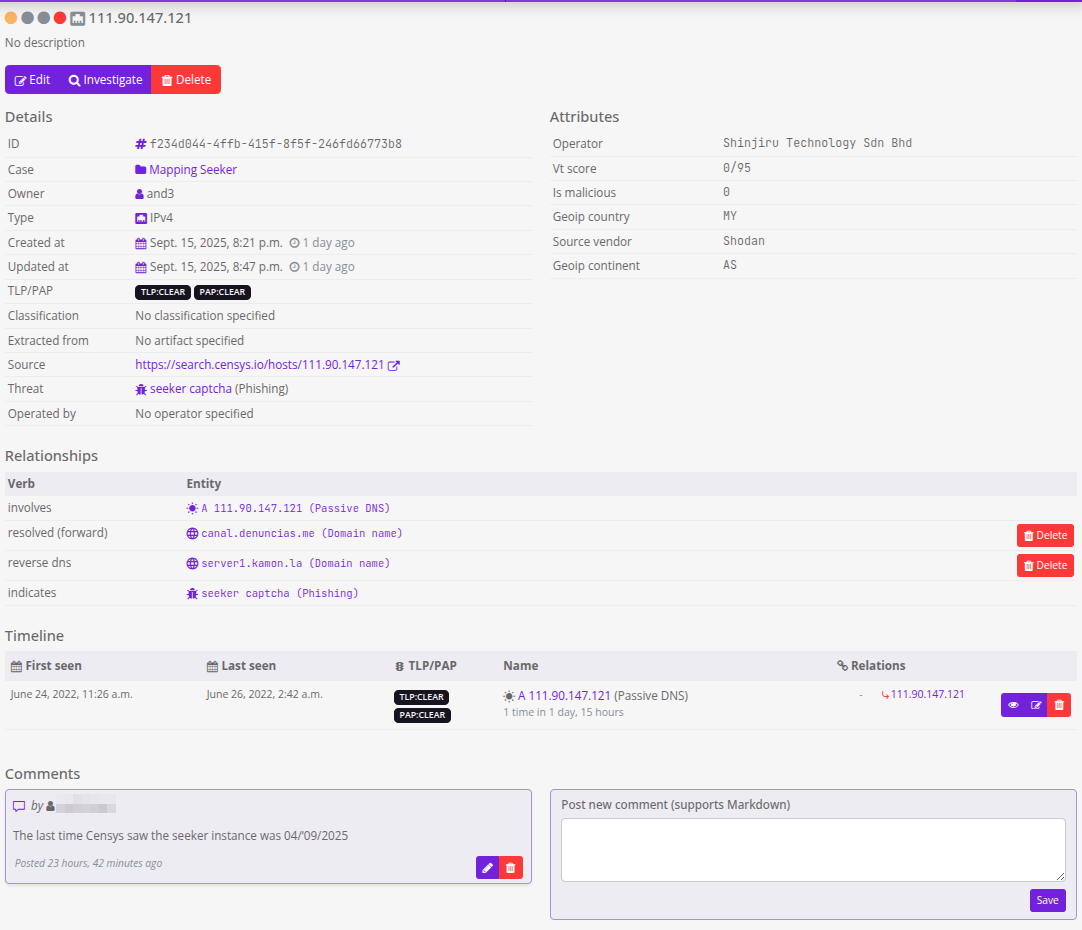
What we add and what we don’t, is a big question, we limit ourselves to domains, IP, and a couple of events and we all associate them with the “Seeker captcha” threat. An example of how the IP screenshot looks, is this:
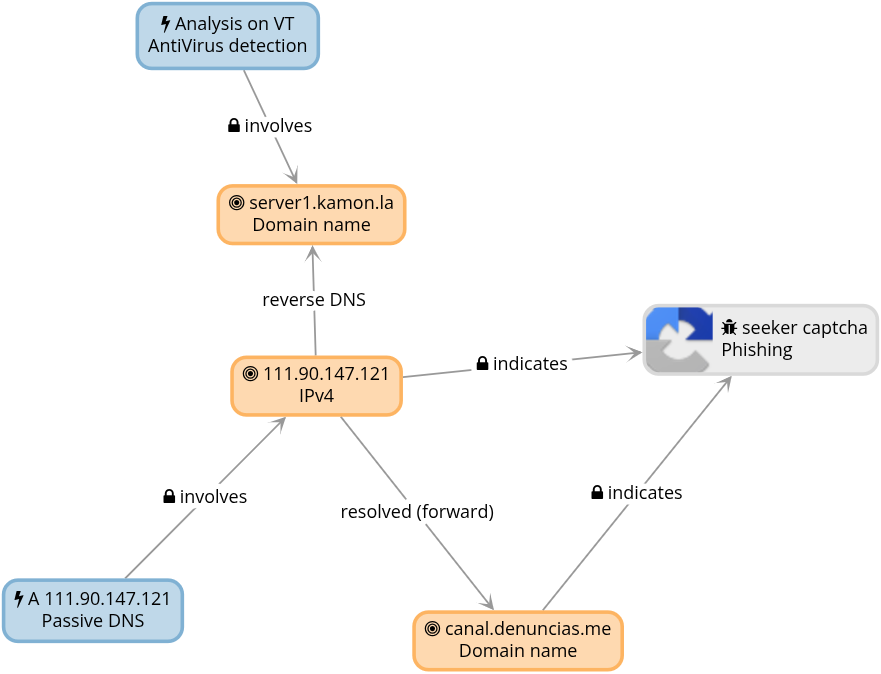
The Graph functionality in Colander gives us a better idea of what the relationships look like, the following screenshot corresponds to a sub-graph of this specific threat:
the full Graph of this experiment (as far as it goes) looks like this:
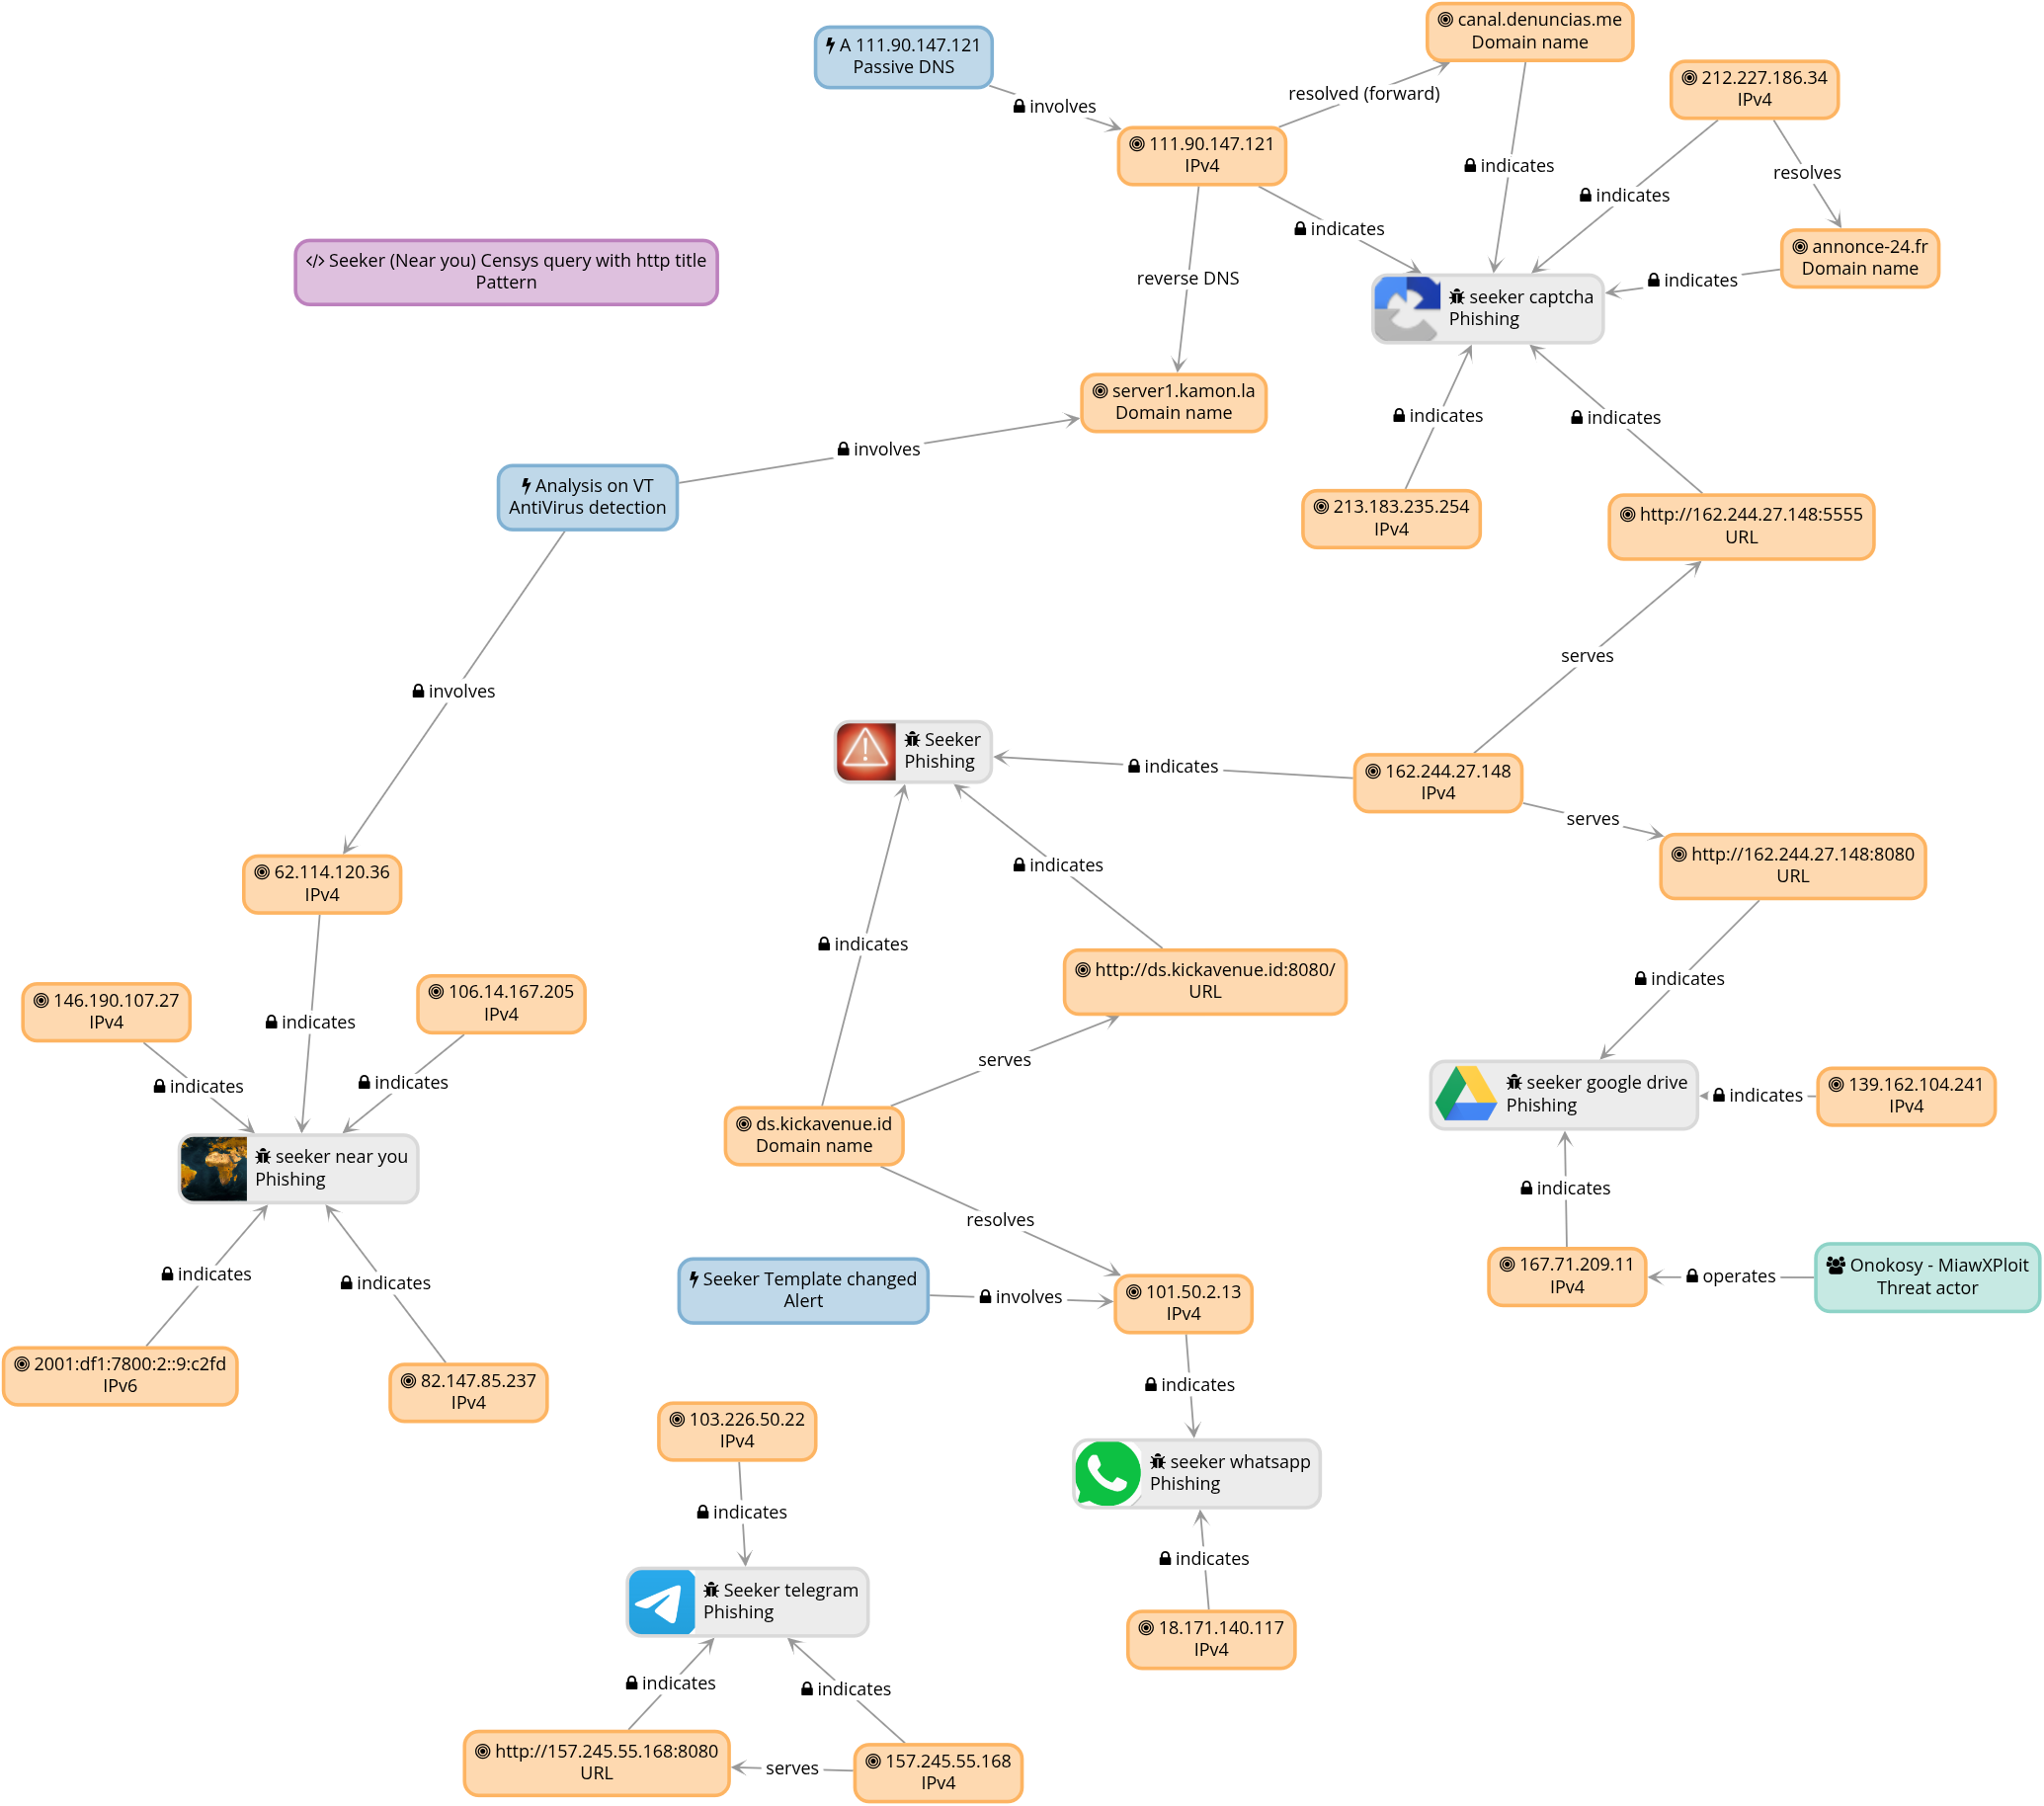
In summary, here we saw the basics to sort findings in Colander; the true value comes when you add context: review DNS history (past resolutions, hosting changes), check with other threat intel bases, look for observables in VirusTotal or other sources, and cross what comes out (dates, routes, certificates, whois, families) to reinforce hypotheses or discard them. All that metadata also lives well within Colander: as tags (e.g. region:latam, template:recaptcha), in descriptions of threats/observables, or in comments with references and trust notes. The more traceability and context that remains attached to the case, the easier it will be to pivot later without losing the thread.
This is “our way”, not the only one
Colander is powerful and comes with very useful ideas for civil society teams: it operates while you investigate, not just as “final file”. There are alternatives like MISP (classic in Threat intel and sharing), with their own advantages; In our experience, Colander has a kinder learning curve to carry living cases and then export data easily. Also coexists well with other systems if you need to publish/consume feeds. (If you want to compare philosophies, see the MISP page; we don’t go into depth here).
–[ 0x05 Export Feeds and use them as IOCs in MVT ]–
Colander has a key piece to “get out” what we found and use it: the feeds. Here we are going to use entity feeds (not rules, that’s for another day). By “entities” we mean what Colander models in the UI: Actors, Artifacts, Devices, Observables, Threats. The idea: export Observables and Threats from this case, download them in STIX2 and point MVT to that file as a source of IOCs.
It is not a Colander course: here we cover the minimum operational. Whoever wants to learn well, to the PTS docs. This chapter is “how we do it”.
0x05.1 Create the entity feed (Observables + Threats)
-
Feeds → Export entities (main menu).
-
What to export: marks Observables and Threats (the rest, off for this experiment).
-
Name + description: something that you later recognize easily.
-
Secret: the feed key. It is mandatory to access.
- You can have several feeds with different content and different secrets (URL + secret - share depending on recipients.
- You can rotate the secret whenever you want (invalidate the previous one).
-
TLP / PAP (the two most confusing fields at fist:
- TLP (Traffic Light Protocol) defines how exported data may be shared.
- PAP (Permissible Actions Protocol) defines permissible actions on the exported data.
- The feed will only include entities whose TLP/PAP equal or exceed the level you select here. If you select “WHITE” only the whites will appear, if at the other end you select the “RED” all will appear: the red, yellow, green and white.
- In this experiment we left both in
WHITE, so no entities labeled asYELLOWare exported (we have some like that because they came from a legitimate server that was compromised and we prefer no to publish them as IOCs).
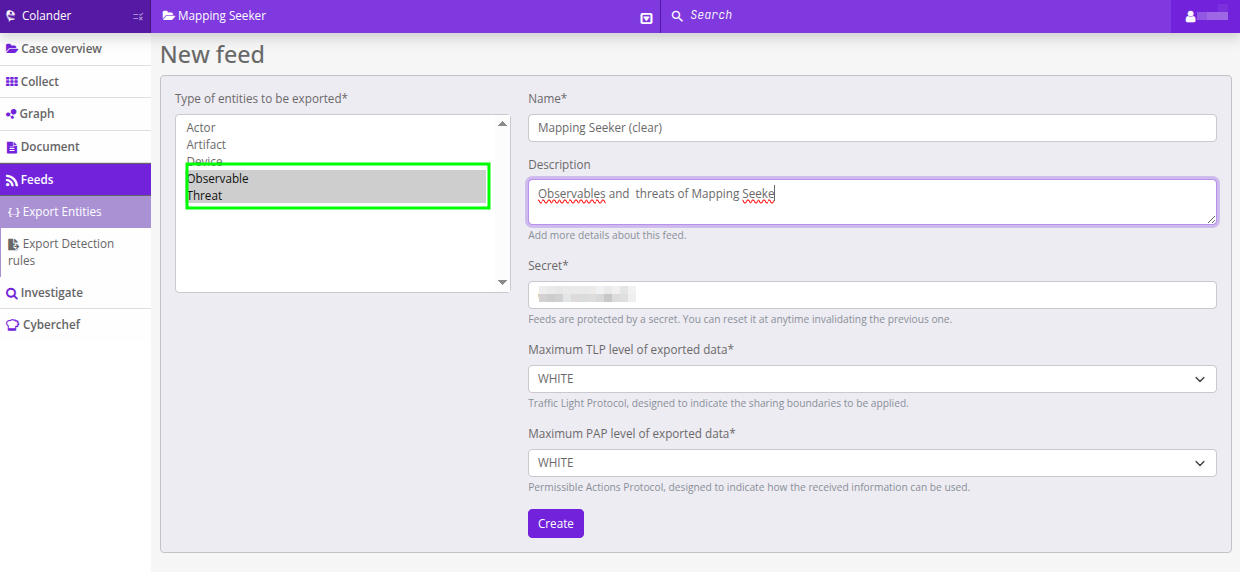
Save. Your feed already appears in the Feeds list.
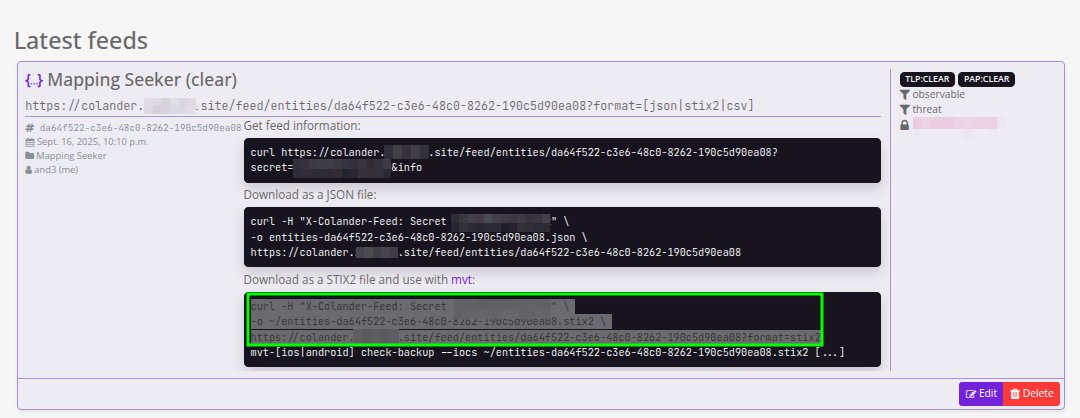
0x05.2 View/use feed: JSON, STIX2, CSV (and cURL ready)
When you see the entry for this feed, you will see a URL with the options to download JSON, STIX2 and CSV, and three boxes with cURL already assembled. For our flow, we focus on the one that says:
“Download as a STIX2 file and use with mvt:”
First we download the feed in STIX2 format.
Be careful with the URL: Colander usually includes parameters with special characters; put the URL in quotes or your shell will choke.
# Download the feed as STIX2
curl -H "X-Colander-Feed: Secret XxxXxXXXxx" \
-o ~/entities-da64f522-c3e6-48c0-8262-190c5d90ea08.stix2 \
"https://colander.somesite.site/feed/entities/da64f522-c3e6-48c0-8262-190c5d90ea08?format=stix2"
0x05.3 Pass MVT with those IOCs (androidqf of the emulator)
We have implanted an SMS with one of the malicious domains in an Android emulator, we performed an extraction with androidqf and we are going to use that extraction in this test.
Now we run MVT pointing to our STIX2 as a source of IOCs. Depending on your extraction type, the subcommand may vary:
mvt-android check-androidqf --iocs ~/entities-da64f522-c3e6-48c0-8262-190c5d90ea08.stix2 ~/androidqf/90eba9d5-95da-429b-8ea0-0e1df58e07dd
Expected output : MVT detects the domain we documented in the case (e.g., the Spanish domain), and —if your feed includes it in STIX2 with relationships— you will see the flag labeled with the Threat’s name.

And with this we complete the circle: from the idea, through research and ending with the application of the results in practical life. Wonderful! :)
–[ 0x06 This is just the beginning ]–
So far, just a warm-up. We scratched the surface and tasty things came out: hosts with more than one lure, others serving malware, some servers with 30+ Seeker instances running at the same time. He who seeks, finds. At first it seems uphill, but when you get down to the task, the pieces fit together, the methodologies fall into place and —as we like to say— we don’t learn to hack: we hack to learn.
At ZoqueLabs this is our thing: experiment, fail fast, iterate and distill practices that serve threat intelligence. This experiment is still open; If you get stuck, if you want to share clues, if you’re curious: reach out to us. We are a node in an ecosystem that needs more nodes —more eyes on threats— to detect them in time, act and document them.
The repository with the Feeds of this experiment can be found here: https://github.com/ZoqueLabs/mapping-seeker-files
See you at the next hunt. Bring coffee, logs and the desire to break your head with love.